CICADAMATA: Esperia Rush and + FOR AEGIS Guide
Esperia is the Sphere Rush mode where every enemy in CICADAMATA is replaced by one thing, the Esper, and completing it is what earns the + FOR AEGIS achievement. The mode comes down to a single mechanic. Shoot an Esper dead and it drags you across the level to the spot it was standing in, with your controls locked for the trip. The run gets much easier once you stop treating that pull as a punishment and start routing around it.
The short version: shoot Espers down at range while the second crosshair is showing, and put solid cover between you and any Esper that gets close to you. Use the death drag as free travel to the next target, since you can still fire while it carries you. Where a level lines several of them up, dash out of one drag straight into the next kill. Check what an Esper is standing over before you shoot, because one that goes off the map kills you, and near an edge or a hazard a dash or slam kill is the safer finisher.
Unlocking Esperia and the + FOR AEGIS achievement
Esperia sits third in the Sphere Rush list, under Normal and CICADADEATH, and it stays locked until you clear CICADADEATH.
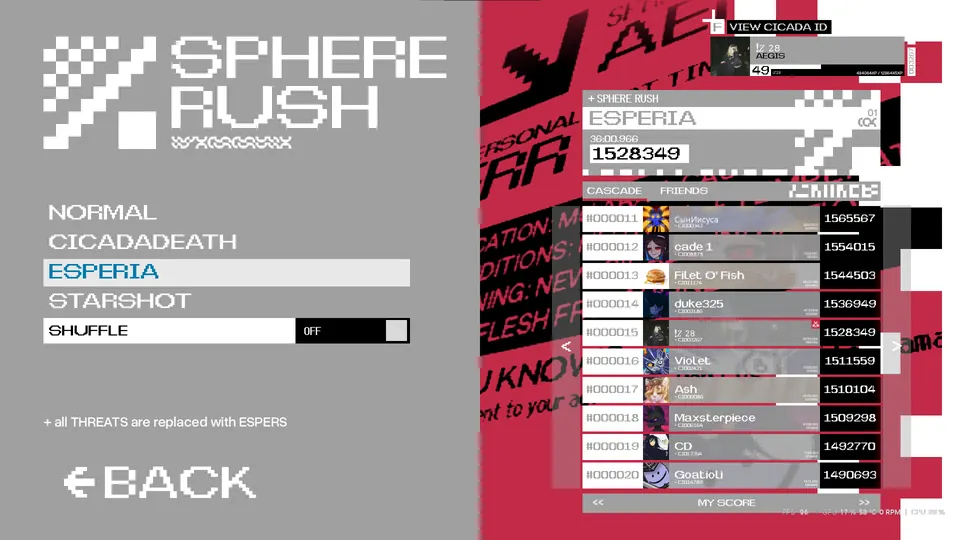
- FOR AEGIS is the achievement for completing the Esperia rush, so the mode and the achievement are the same piece of work. The select screen states the twist plainly: all threats are replaced with Espers, the enemy you first meet in sphere 2-1 GLACIER over in ICEBOX.
Esper damage, drag and hazard rules
Everything the enemy does comes down to the values below. They are accurate at the time of writing, and a patch can move any of them.
| Behaviour | Value |
|---|---|
| Contact damage | About 600 per second, and only at close range |
| Time in its range before it kills you from full health | About 8.3 seconds |
| Damages you through glass | Yes |
| Damages you through walls | No, it needs line of sight |
| Drag duration after it dies | About 1 second |
| Drag reaches you through walls | Yes |
| Drag kills enemies in its path | No |
| Dash and direct slam kills start the drag | No |
| Jump pad momentum during the drag | Horizontal momentum is kept |
| Shooting while being dragged | Allowed |
| Damage taken while being dragged | None once it has hold of you, other than as it starts |
| An Esper that falls off the map | Kills you |
| An Esper killed by lava or spikes | Costs you health |
How the death drag moves you
Espers are the game’s teleport enemy, and this drag is what the teleport actually is: it moves you, not them. It takes your movement inputs away for as long as it lasts and puts you down on the spot where the Esper was standing. That makes every ranged kill a decision about where you want to be next, so pick the target that leaves you somewhere you can work from.
The one movement thing it does not flatten is a jump pad. Horizontal speed from a pad carries through the drag, so if you bounce and then kill something mid-flight you can come out of the pull still travelling and overshoot the landing you had in mind.
Breaking line of sight when an Esper is on you
When your health starts draining, get solid geometry between you and the Esper instead of trying to out-trade it. Drop through a floor, step behind a pillar, take the corner, and the damage stops as soon as the sightline is gone. Choose real cover when you do it. A glass panel between the two of you leaves you completely exposed and the drain simply carries on.
The second crosshair: shooting Espers at range
Your HUD adds a second crosshair when your aim crosses an Esper, and it only appears when the Esper is within a certain distance of you. Take it as your cue to fire, because thinning a group out from where you stand is far cheaper in health than walking into the middle of it.
Chaining drags and dashes through a line of Espers
Most levels put Espers in rough lines, and that is the shape to exploit. Kill the first one, fire during the drag to set up the second, and you arrive already committed to the next kill. The drag protects you once it has hold of you, so the exposed moment in a chain is the start of each pull rather than the ride.
Once you land, keep dashing rather than saving the cooldown. The dash itself carries invincibility, and the whole manoeuvre, coming out of one drag and dashing into the next Esper, generally costs under 100 HP.
Espers over pits, lava and spikes
Check what an Esper is standing over before you commit to a shot. Near an edge or a hazard, use a dash or a slam instead: a movement kill does not start the drag, so it removes the Esper without moving you anywhere, and it is the same option to reach for any time you would rather hold the position you are in than be pulled out of it.
More CICADAMATA" guides
-
achievementsCICADAMATA: All Achievements Guide
How to unlock all 32 CICADAMATA achievements, including story clears, gameplay challenges, level milestones, Sphere Rushes, and secrets.
Published September 15, 2026
-
CICADAMATACICADAMATA: How to Decode CCDA Text
How to decode CICADAMATA's CCDA circle and box typefaces, read Dotsies, scan barcodes, and handle omitted vowels or rotated text.
Published September 10, 2026
-
farmingCICADAMATA: How to Farm Points for DMND
How to farm points in CICADAMATA to reach DMND rank, with what every action is worth and the scoring routes for all seven enemy types.
Checked October 9, 2026
-
locationsCICADAMATA: All Sphere Terminal Locations
Where to find all 18 sphere terminals in CICADAMATA, with a screenshot for every one and the area each of them sits in.
Checked October 9, 2026