TOEM 2 Achievements: How to Unlock All 23
This page gets you every one of the 23 achievements in TOEM 2. It goes region by region, Homelanda, Cropten, Taletorp, Deltburg and Whirlhill, and then lists every outfit, critter, sight, photo frame and radio jingle the collection achievements ask for, with where to find each one.
The short version: four achievements are for finishing every quest in a region, and Stamp Savant wants every quest in the game. Eight more are collections that run across the whole trip. The rest are single tasks, like toasting bread, smashing pots or scoring a goal. TOEM 2 is a relaxed game and most quests finish themselves if you talk to everyone and do what they ask, so the sections below spend their words on the ones that do not.
Spoiler warning: quest solutions, hidden items and the final area are all described in full.
How the area numbers work
The Cropten, Taletorp and Deltburg sections each have a map with numbered areas, and locations in those three regions point at one of them in square brackets. Cropten [4] means area 4 on the Cropten map. These numbers are labels for this page, not something the game shows you.
All 23 achievements at a glance
| Achievement | What it takes | Section |
|---|---|---|
| Homey Happenings | Finish the three Homelanda quests | Homelanda |
| Flourishing Fulfillment | Finish all 20 Cropten quests | Cropten |
| Make Toast | Toast one slice of bread | Cropten |
| Rural Retreat | Finish all 19 Taletorp quests | Taletorp |
| Rage Room | Smash every pot in one tavern room | Taletorp |
| Great Fall | Survive a long drop and land standing | Collections |
| Join A Band | Drum with the bard once he plays in the tavern | Taletorp |
| Waterway Wanderer | Finish all 17 Deltburg quests | Deltburg |
| Soccer Goal | Kick the ball into the goal | Deltburg |
| Picking It Up | Recycle every bottle in Deltburg | Deltburg |
| Scholar | Read every book in the Deltburg library | Deltburg |
| Big Head Mode | Wear the Big Head Mask | Deltburg |
| Experience TOEM | See the Whirling Birch bloom | Whirlhill |
| Group Photo | Take a photo with all your friends in it | Whirlhill |
| Playing Dress Up | Own every clothing item | Collections |
| A Combined Effort | Own the clothing borrowed from other games | Collections |
| Collect Them All | Photograph every critter in the compendium | Collections |
| Sightseeing | Photograph the five sights | Collections |
| Leave Your Mark | Put photos in five empty frames | Collections |
| FM Fantastic | Find all 11 radio jingles | Collections |
| To the Top | Finish the three Climbing Challenges | Collections |
| A Keen Eye | Finish the three Photo Challenges | Collections |
| Stamp Savant | Finish every quest in the game | Collections |
Homelanda
Homey Happenings
Homey Happenings only needs the three Homelanda quests. Each one ends the moment you do what was asked.

| Quest | What to do |
|---|---|
| Photo of Nana | Take Nana’s picture and show it to her. |
| Critters to Adore | Photograph the four Homelanda critters. None of them are hidden (see Collect Them All). |
| Take Flight | Talk to the man on the roof and photograph the first paper plane he throws. His second throw flies off for good, so the first one is the shot. |
Before you leave Homelanda
Three things at home count toward collection achievements later, and they are easiest to do now:
- Open the giftbox behind your house for the Traveling Cap (Playing Dress Up).
- Take a photo of your own house. It is the first sight, Home Sweet Home (Sightseeing).
- Put any photo into the empty frames: two are in your room and one is on the dresser in front of Nana’s bed (Leave Your Mark).
Cropten
The Cropten map has twelve numbered areas. This table says who lives in each numbered area and what else is there.
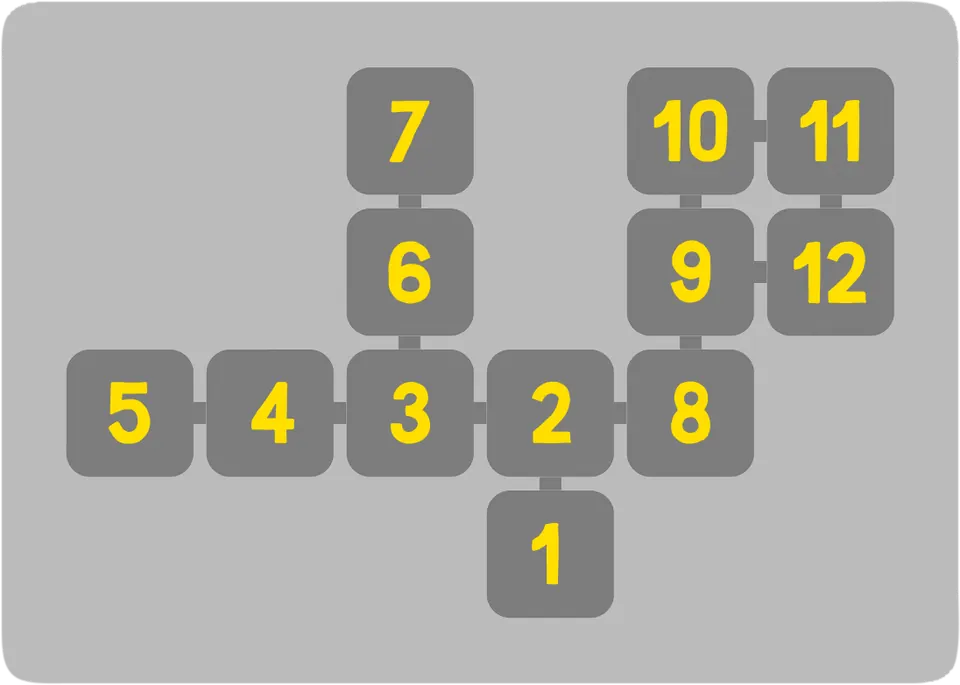
| Area | Who is there | Also here |
|---|---|---|
| [1] | Pearl the Gardener | Bus station |
| [2] | Cloudy, Gnome Keeper | Gadget Museum, jam maker |
| [3] | Mother Pig, Rancher | Greenhouse with The Fancy Pot |
| [4] | Beekeeper, Hairy Potato | Clothing store with a radio and a giftbox |
| [5] | Shepherd | Giftbox on the roof |
| [6] | Bear, Mountain Goat, Sleeping Farmer | Giftbox on the roof |
| [7] | Mechanic | Giftbox inside, tree trunk behind the house |
| [8] | Planter | The Grand Sunflower sight |
| [9] | Nobody | Giftbox hanging on a rope, radio |
| [10] | Baker | Windmill, giftbox behind it, giftbox high in the mill room |
| [11] | Giant, Rabbit, Photo Scout | |
| [12] | Dandelion Siblings |
Jam Apples
Three Cropten quests each want a jar of jam, and the jam maker in [2] turns apples into jars. Apple trees stand in [3], [5], [8], [11] and [12], each carrying three Jam Apples. Snip them loose with your scissors and pick them up off the ground. You need all 15 for the three jars, so take every one you pass.
Flourishing Fulfillment
Flourishing Fulfillment wants every one of the 20 Cropten quests in your journal finished. The table gives where each starts and the step people tend to miss.

| Quest | Where | How to finish |
|---|---|---|
| Make a Friend | [1] | Pearl turns your camera into scissors. Snip every flower off the troublesome vines in [1], [7], [10], [12] and last of all [2], until Pearl stops sneezing. |
| Head in the Clouds | [2] | Look for a cloud throwing a shadow on the ground, in [2], [6] or [11]. Hold focus on it until it changes shape, photograph it, and show Cloudy. Each spot gives a different shape (a carrot, a flower, a bee). It is unclear whether Cloudy needs one shape or two, so photograph two before going back. |
| Gnome Over | [2] | The gnomes are by the stairs in [4], by the faucet in [6] and by the gate in [10]. Photograph all three and show the Gnome Keeper. |
| Raspy Rooster | [3] | Give the Rancher a jar of jam. |
| Muddy Monsters | [3] | Mother Pig gives you three bars of soap. Wash the muddy piglets in [5], [10] and [12], then go back to her. |
| Hairstylist | [4] | Snip Hairy Potato’s hair into any style you like, photograph it and show them. |
| The Bees and the Jams | [4] | Set a jar of jam on the bee feeder, then talk to the Beekeeper. |
| A Cut Above the Rest | [4] | Talk to the lady in the clothing store and cut the fabric for her. |
| Missing Cat | [5] | In [3], focus on the tiny flower in the big pot next to the steps up to Mother Pig’s house. The cat appears. Photograph her and show the Shepherd. |
| Jam Scare | [6] | Hand the bear a jar of jam. |
| Climbing Challenge | [6] | The flag is on the roof of the taller house, a couple of jumps up. Grab it and talk to Mountain Goat. |
| Harvest Helper | [6] | Help the Sleeping Farmer with the harvest, then wake them up again. |
| Pot or Not | [8] | Photograph the can in [2], the cup in [3], the old boot in [7] and the pan in [9], all lying on the ground. Show the Planter. |
| Needle in a Haystack | [10] | Already in your journal when you arrive. Photograph the haystack with the needle in it and it completes on the spot. |
| Migrating Scarecrow | [10] | Pick him up. Planting him in the ground hole in [3] or the roof hole in [8] only gets you his complaints. Setting him up inside the Shepherd’s house in [5] finishes it. |
| Getting That Bread | [10] | Talk to the baker in the Windmill, then climb the mill room to the very top, snipping vines on the way up. Report back. |
| Stubborn Seed | [11] | The Giant is up on the roof. Take his seeds to The Fancy Pot in the greenhouse in [3], photograph the flower that grows and show him. |
| Unwanted Renovation | [11] | Take a Dog Biscuit from the bakery tray in [10]. Talk to Rabbit indoors, then put the biscuit in the empty dog bowl on her roof and talk to her again. |
| Photo Challenge | [11] | See A Keen Eye below. |
| Dandelion Danger | [12] | Photograph the friendly dandelion inside the Planter’s house in [8] and show it to the Dandelion Siblings. |
Make Toast
Make Toast needs one slice of bread in a toaster. Finishing Getting That Bread gives you the bread. Carry it to the toaster inside the Gadget Museum in [2] and use it.

Taletorp
The Taletorp map has fourteen numbered areas. This table says who is in each numbered area and what else is there.
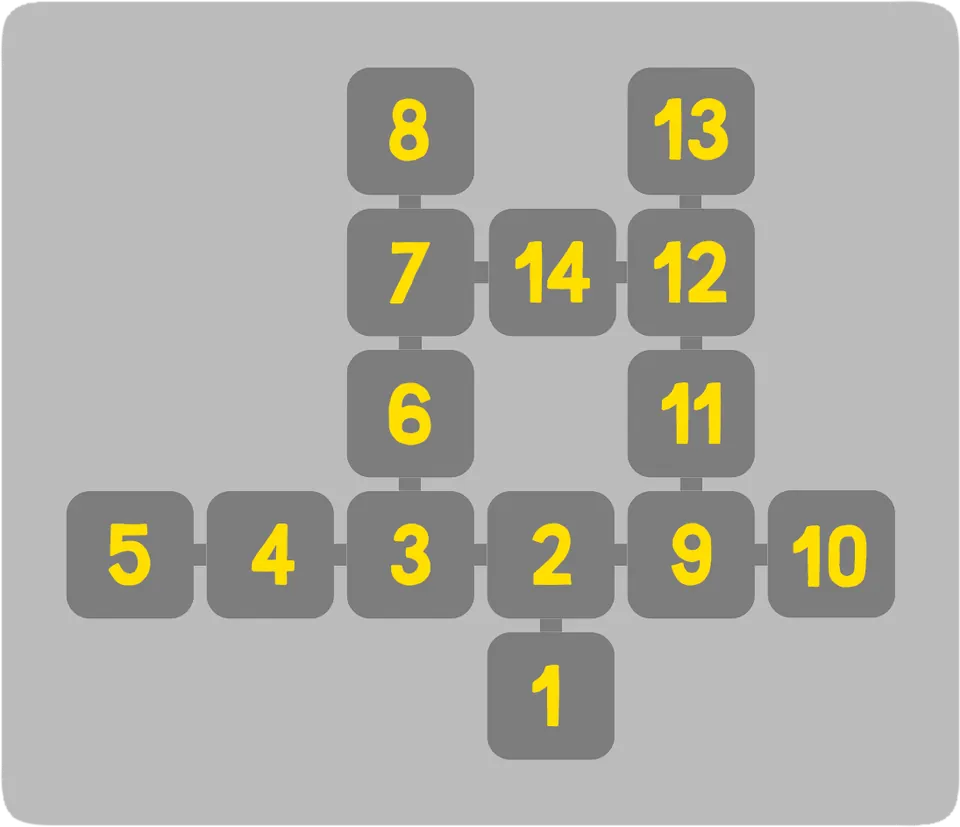
| Area | Who is there | Also here |
|---|---|---|
| [1] | Blacksmith, Gob the Builder | Bus station, giftbox up in the run-down tower |
| [2] | Donkey Owner, Mountain Goat | Tavern, giftbox on the tavern roof |
| [2] tavern | Commander, Bard (later) | Haunted room and rage room, each with a radio; giftbox upstairs on a stack of pots |
| [3] | Apple Lover, Sculptor | |
| [4] | Wizard | Giftbox on a roof |
| [5] | Man in a question mark hat | Radio |
| [6] | Lumberjack | Giftbox behind a stone block |
| [7] | Nobody | Shovel, cave with a giftbox, the Cavern’s Light sight |
| [8] | Potion Seller | Giftbox on the hill |
| [9] | Archer, Crying Knight | Giftbox in the passage |
| [10] | Trickster | Giftbox |
| [11] | Young explorer (inside) | Catacombs entrance, giftboxes in the dice room and the question mark room |
| [12] | Photo Scout, invisible troll | |
| [13] | Bard | Tower with a giftbox inside |
| [14] | Troll, Postman |
Toadstools
Three Taletorp quests end with a potion. The Potion Seller in [8] brews one from 5 toadstools plus the order slip the quest-giver hands you. Toadstools grow in [7], [8], [10], [11] and [12], 15 in total, and the three potions use exactly 15. Pick up every one you see.
Rural Retreat
Rural Retreat wants every one of the 19 Taletorp quests in your journal finished. Three of them have their own sections further down.

| Quest | Where | How to finish |
|---|---|---|
| Explore the catacombs | On arrival | See the section below. |
| Make a Friend | [1] | Gob the Builder hands you a hammer. Help him at the gate in [1], the bench in [4], the ladder in [10], the bridge in [11] and finally the bell tower in [2]. While Gob holds the structure steady, aim at a nail and its hammering pattern shows up beside it. |
| Thrill of the Hunt | [2] | Follow the hoof prints. The donkey is in [8]. Photograph it and show its owner. |
| Not So Knight | Tavern | The three apprentices are in [4] (in the run-down house with barrels under a tree), [7] (in the cave behind a large stone you break with the hammer) and [10] (out in the open). Talk to all three. |
| Comically Stuck | Tavern, upstairs | Bonk the pot stuck on the jester’s head with your hammer. |
| Climbing Challenge | [2] | The flag is on the tavern roof. Go up through the building, climb out the window of the right-hand room upstairs, then grab the flag and talk to Mountain Goat. |
| Sculpting a Masterpiece | [3] | See the section below. |
| Out of Juice | [4] | Take the wizard’s Order of Mana and 5 toadstools to the Potion Seller in [8], then bring the potion back. |
| Side Quest Quest | [5] | Talk to the man in the question mark hat, then sit on the stump and play his game of bonking devilkins. |
| Absent Timber | [6] | The felled tree landed in [12]. Photograph it and show the Lumberjack. |
| Troll Bridge | [14] | The troll wants one photo of three goats. They graze in [9]. It only counts if the camera recognises all three goats in the shot. |
| Perfect Aim | [9] | After talking to the archer, photograph the Apple Lover in [3] and show the picture to the archer. |
| A Knight in Crying Armor | [9] | Take the knight’s Order of Ouchie and 5 toadstools to the Potion Seller, then give the knight the potion. |
| Stove Obsession | Catacombs, [11] | Settled with the skeleton in the first catacombs chamber. See the section below. |
| Photo Challenge | [12] | See A Keen Eye below. |
| Invisible Mayhaps | [12] | Focus on the stone circle on the ground to find the invisible troll and get the Order of Visibility. After the Potion Seller, focus on the circle again and hand over the potion. |
| Mysterious Address | [14] | Flip the postman’s envelope to see a lyre symbol. The same lyre is on the plaque of the house left of the wizard’s in [4]. Photograph it and show him. |
| Tower of Love | [13] | Climb the tower to its top room and speak with the empty photo frame there. Then go back down and talk to the bard again. |
| Princess Display | [13] | Wear the Princess Dress set (giftbox on the tavern roof) and the Princess Hat (giftbox at the top of the tower). Take a selfie and give it to the frame. |
Explore the catacombs
You need a map before you go in. Upstairs in the tavern in [2], enter the left of the three doors, talk to the old adventurer and photograph the catacombs map hanging on the wall. That photo is your map.
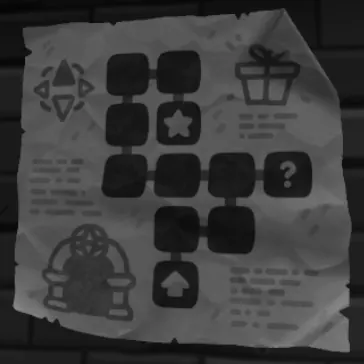
The catacombs entrance is in [11]. Go through the gate north of the first chamber to meet the young explorer, then follow your map photo. The floor mosaic always marks north. The room with the bench and the backpack, where the explorer stands, is the first room on the map. The question mark room holds a giftbox. Take the treasure, drop through the hole in the floor to get back to the explorer and hand it over.
The chamber left of the first room holds a dice puzzle. Bonk the stone on the ground with your hammer, then bonk the dice until two knights face up together. A giftbox opens.
Stove Obsession
The skeleton in the first catacombs chamber shows you the drinking horn symbol of their old house. That house is the run-down one on the left in [5], where a fallen plaque carries the same horn. Photograph the stove buried in twigs inside, then show the skeleton the photo.
Sculpting a Masterpiece
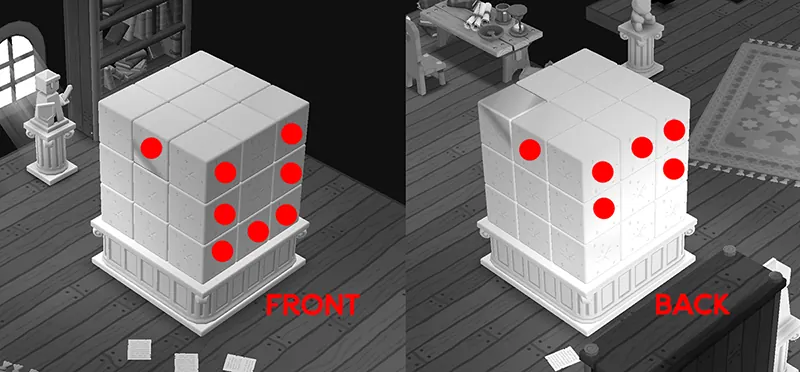
The sculptor lives in [3]. Talk to them, then bonk the cubes of the stone block in the pattern below, on both the front face and the back face.
Rage Room
Rage Room is upstairs in the Taletorp tavern, behind the middle of the three doors. Smash every pot in that room. Touch the radio while you are in there, since it is one of the jingles.

Join A Band
Join A Band comes after Tower of Love. Once that quest is done the bard plays in the tavern in [2]. Bonk the drum behind him with your hammer, then talk to him.

Deltburg
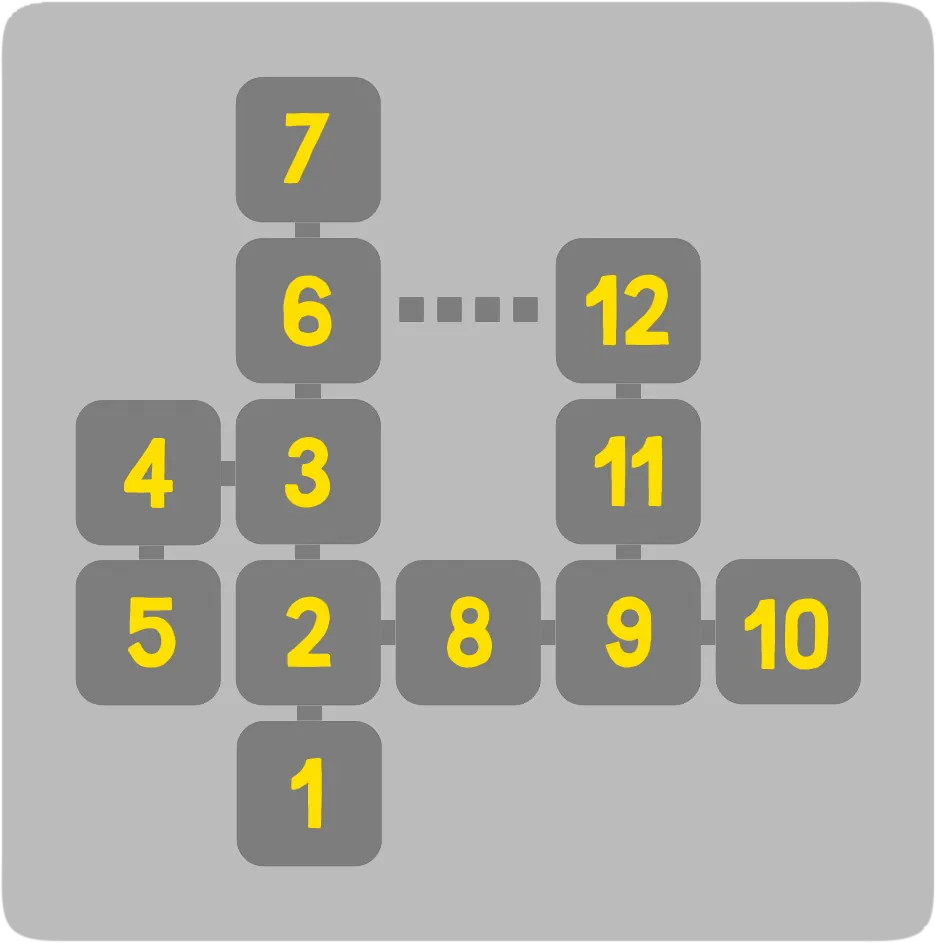
The Deltburg map has twelve numbered areas. The dotted line from [6] to [12] is the sewers, which you can enter through a service door in either area.
| Area | Who is there | Also here |
|---|---|---|
| [1] | Plum the Plumber | Bus station, a bike in Plum’s house |
| [2] | Boss and an imp (office), marine biologist (Aquarium) | Fountain with the Aquatic Ensemble sight, giftboxes in the office and the Aquarium staffroom |
| [3] | Sad lady | Giftbox in the water |
| [4] | Imp (Doing Business) | Gable vent on the roof |
| [5] | Fish-person eating garlic | Giftbox on the roof, meditation room |
| [6] | Old lady | Giftbox on the roof, sewers door (an imp waits in the sewers) |
| [7] | Groggy man | |
| [8] | Smell Shop, imp (Sweet Deal) | Giftbox above the water jet |
| [9] | Librarian, cat-person, robot, imp (Doing Business) | Library, photo studio, club, coffee cart on a roof |
| [10] | Flower-person on the balcony | Soccer goal, escape room |
| [11] | Professor Bedhead, Photo Scout | Giftboxes on the roof and inside the professor’s dream |
| [12] | Ghost, Mountain Goat | Sewers door, giftbox in the ghost’s house |
Waterway Wanderer
Waterway Wanderer wants every one of the 17 Deltburg quests in your journal finished. Two of them need more than a line, and their rows point to sections below. The escape room also has a section, for its collectibles.

| Quest | Where | How to finish |
|---|---|---|
| Feed a Fish | Aquarium, [2] | Fetch the fish food from the shelf in the staffroom (door next to the Seahorse tank). Turn the three screws on the pipe toward the tank upstairs, then drop the food into the hatch up there. |
| Under Pressure | [10] | Climb the planks to the flower-person on the balcony. Close all three screws on their pipe with the screwdriver and talk to them again. |
| Make a Friend | [1] | See the section below. |
| Left Hanging | [2] | Turn the two screws on the lift any way you like. The man cannot fall. Photograph the billboard and show him. |
| Doing Business | Office, [2] | Take the job and wear the Business Suit set you get, because imps ignore you otherwise. An imp turns up in the office straight away; close that deal and hand the contract to the boss. Three more imps wait in [4], in the sewers below [6] and in [9]. Bring the boss those three contracts. |
| Evolutionary | Aquarium, [2] | Photograph the three singing fish: Pollypran in [7], Larvalto in [9] and Adulbass in [10]. Pin their compendium photos on the marine biologist’s board in that order. |
| Lost Ring | [3] | The ring floats up out of the chest in the Aquarium’s Sunfish tank. Photograph it and show the sad lady. |
| Moving In | [6] | Fill each marked spot in the old lady’s room with any item you like. No choice is wrong. |
| Locked Out | [12] | In the sewers, turn every screw on the pipe to the left and pick up the key that drops. Give it to the ghost. |
| Climbing Challenge | [12] | Climb the tower using the planks and pipes, take the flag from the top and talk to Mountain Goat. |
| Cosmic Dreams | [11] | See the section below. |
| Photo Challenge | [11] | See A Keen Eye below. |
| Creative Freedom | Photo studio, [9] | Leave the camera on the tripod. Use the lever on the right of the screen to pick a backdrop and move props from the stage into place. Dressing up is optional. If the cat-person turns the photo down, take it again while striking a pose. |
| Comedy Routine | Club, [9] | Talk to the robot and take a seat. It needs a photo of a bike. Plum’s house in [1] has one, and there are plenty around town. Then take your seat in the club again for the rest of the routine. |
| Smelly Findings | Smell Shop, [8] | Photograph five smelly things: the can of fish in [3], the garlic in [5], the cheese on the librarian’s desk in [9], the trash bags by a wall in [9], and the sneakers in [10]. Smelly things give off a visible waft, but the sneakers hang on a cord between a tree and a wall and are easy to miss. |
| Sweet Deal | [8] | Photograph the deer painting hanging between the security cameras in the library in [9] and show the imp. |
| Morning Battle | [7] | Get Hot Bean Slurp from the coffee cart on the roof in [9] by bouncing off the balloons. A fall from too high costs you the slurp and you have to go back for another, so climb down in steps. Take it to the groggy man on the roof in [7]. |
Make a Friend in Deltburg
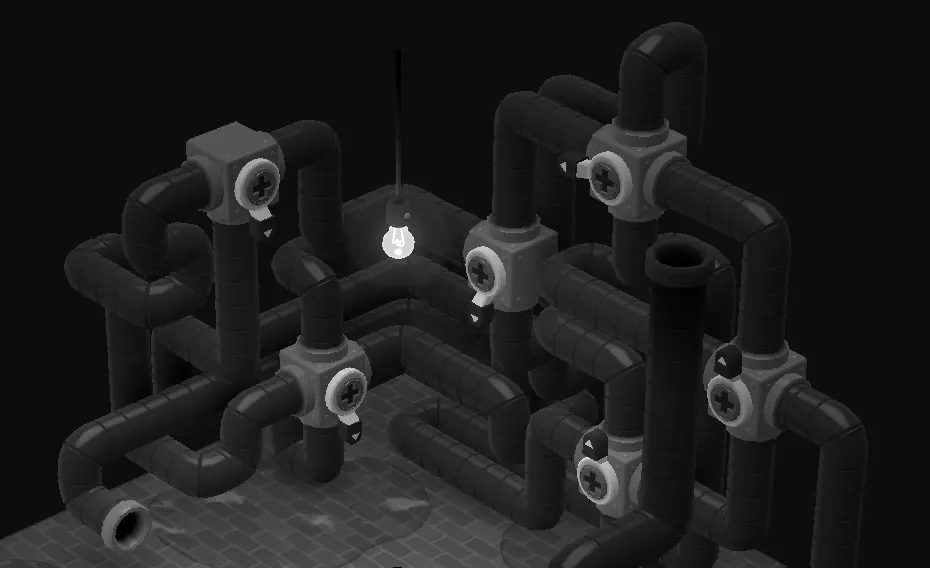
Plum gives you a screwdriver, and each pipe job is about turning screws so the clog travels to Plum’s plunger. In [1] just steer the flow toward him. In the Aquarium staffroom, go downstairs and set the first screw left, the second up and the third right, or follow the clog and turn whatever screw it sticks at. In [7], turn both screws to the left.
The last job starts when you read Plum’s plaque by the fountain in [2] and talk to him. Follow him to the maintenance room downstairs, talk again, and set the screws so the clog reaches him. This is one working layout for that final clog:
Cosmic Dreams
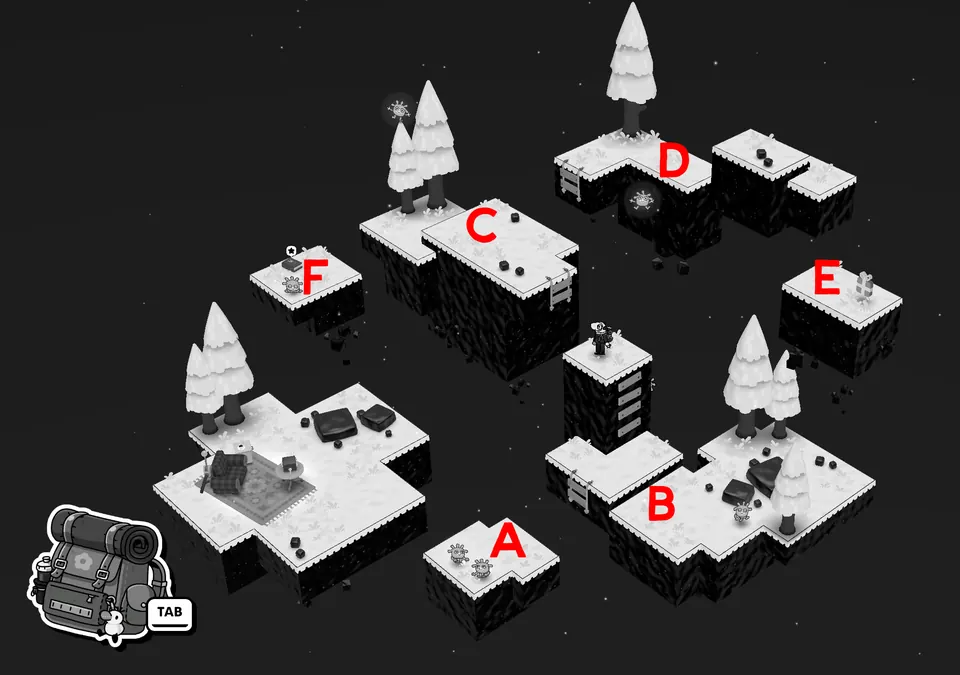
Cosmic Dreams happens in [11], at Professor Bedhead’s house with the antennas. Talk to him, sit in the chair and use the Sleep Machine. Inside the dream, hop to island A, then B, climb up, and cross C and D to E for a giftbox. Drop back to B, climb to C again and jump across to F. The book on F is about Cosmotastic Formulas. Photograph the formula inside it, drop to the first island with the chair to wake up, and show the professor.
The escape room
The escape room in [10] has a radio jingle and a giftbox, so it counts toward two achievements. Use the screwdriver on two screws to pull the plank off the door. Inside, pick up the phone, climb the planks to touch the radio, and sit in the chair. A scroll drops to the floor. It shows which floorboards to step on and in what order.
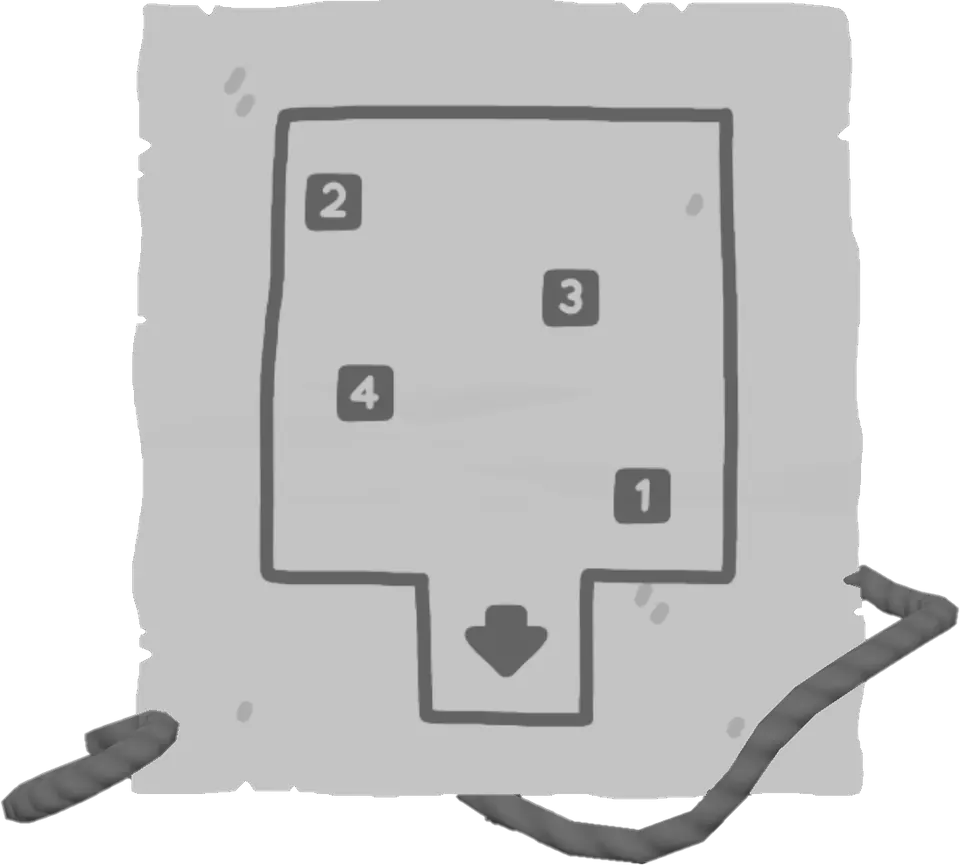
After the floorboards a cabinet opens with a screw inside. Turn it all the way, then leave camera mode quickly and catch the falling lightbulb. Put it in the lamp on the table. The owl on the shelf opens its eyes; focus on it and the painting above the chair slides up. Photograph the key behind it and put that photo in the empty frame by the locked door. The giftbox is through that door.
Soccer Goal
Soccer Goal is in [10]. Photograph the Poggy sitting on the goal if you have not yet, then kick the ball into the goal.

Picking It Up
Picking It Up wants every bottle in Deltburg recycled. They sit around trash cans in four places: outside in [2], the fourth room of the Aquarium, [5] where you drop down from the roof, and [10]. Interact with each pile.

Scholar
Scholar is in the library in [9]. Talk to the librarian and read all four books.

Big Head Mode
Big Head Mode only needs the Big Head Mask on your head. In [4], cross the water, climb the planks to the roof and talk to the gable vent to get it, then equip it.

Whirlhill
Experience TOEM
Experience TOEM is the end of the road. In Whirlhill, talk to everyone and take part in the reporter’s interview. Then climb the stairs, read the plaque by the Whirling Birch and focus your camera on the leaf until the birch blooms. Photograph the tree in bloom, since it is the fifth sight. Whirlhill has a single quest of its own. It completes somewhere in these steps, but which step closes it is not pinned down here.

Group Photo
Group Photo comes right after. Put your camera on the tripod and talk to Pearl, Gob and Plum, the three friends marked with exclamation points instead of the usual dots. Stand with them on the platform and take the picture.

Collection achievements
These run across every region, and Great Fall sits here too, since the known way to earn it starts from a Climbing Challenge flag spot. Pick them up as you go, and use the tables to find whatever you missed.
Playing Dress Up
Playing Dress Up wants every clothing item in the game. Most are in giftboxes, and the table below says where each one hides. The Pyjamas are what you start in.

| Item | Area | Where |
|---|---|---|
| Pyjamas | Homelanda | You start wearing them |
| Traveling Cap | Homelanda | Giftbox behind your house |
| Overalls | Cropten [4] | Reward for A Cut Above the Rest |
| Bandana | Cropten [4] | Giftbox in the clothing store |
| Apple Hood | Cropten [5] | Giftbox on the roof |
| Gnome Hat | Cropten [6] | Giftbox on the roof (route below) |
| Hop Mask | Cropten [7] | Tree trunk behind the house |
| Floral Pin | Cropten [7] | Giftbox in the house |
| Straw Hood | Cropten [9] | Giftbox on a rope; snip the rope with your camera |
| Gnome Attire | Cropten [10] | Giftbox near the top of the mill room |
| Ribbon | Cropten [10] | Giftbox behind the Windmill |
| Woolen Tunic | Taletorp [1] | Giftbox in the run-down tower |
| Lion Hood | Taletorp [2] | Giftbox on the stack of pots upstairs in the tavern; bonk the pots |
| Princess Dress | Taletorp [2] | Giftbox on the tavern roof |
| Wizard Hat | Taletorp [4] | Giftbox on the roof of the house on the left (route below) |
| Archeologist Attire | Taletorp [6] | Giftbox behind the stone block under the hill; bonk the block |
| Stalwart Helm | Taletorp [7] | Bonk the shovel with your hammer and look in the glowing hole it digs |
| Mushroom Hood | Taletorp [7] | Giftbox in the cave, past the rope |
| Woolen Hood | Taletorp [8] | Giftbox on the hill, behind the donkey |
| Knight Armor | Taletorp [9] | Giftbox in the passage to the shooting range |
| Jester Hat | Taletorp [10] | Giftbox for answering the trickster’s three riddles: Toadstool, Blacksmith, Tavern |
| Knight Helmet | Taletorp [11] | Giftbox from the catacombs dice puzzle |
| Archeologist Hat | Taletorp [11] | Giftbox in the catacombs question mark room |
| Princess Hat | Taletorp [13] | Giftbox high up in the tower |
| Trilby | Deltburg [2] | Giftbox in the office |
| Business Suit | Deltburg [2] | Take the job in the office |
| Bing Bong Mask | Deltburg [2] | Suitcase on the office roof (route below) |
| Aquarium Cap | Deltburg [2] | Giftbox in the Aquarium staffroom, on top of the crates |
| Sailor Hat | Deltburg [3] | Giftbox in the water, reached over the logs |
| Big Head Mask | Deltburg [4] | From the gable vent on the roof |
| Robe | Deltburg [5] | Giftbox on the roof with the tree |
| Sailor Suit | Deltburg [6] | Giftbox on the table on the roof |
| Robot Hood | Deltburg [8] | Giftbox floating on the water jet |
| Bowler Hat | Deltburg [10] | Giftbox through the locked door of the escape room |
| Piku Mask | Deltburg [11] | Giftbox on island E in the professor’s dream |
| Pop Cap | Deltburg [11] | Giftbox on the roof above the Photo Scout |
| Top Hat | Deltburg [12] | Giftbox in the ghost’s house |
| Mountain Goat Mask | Anywhere | Reward for To the Top |
| Photo Challenger Fit | Anywhere | Reward for A Keen Eye |
The Gnome Hat in Cropten [6] takes a climb. From behind Mountain Goat, jump onto the smallest tree, then the middle one, then the tall one. Walk along the top of the wooden gate to the tall tree next to the Sleeping Farmer, jump onto it, then onto the vent above the farmer and up to the roof.
For the Wizard Hat in Taletorp [4], walk around the wizard’s house to find boards on the wall. Climb them to the roof and jump across to the neighbouring roof from its highest point.
For the Bing Bong Mask in Deltburg [2], go behind the Aquarium. Use the plank and three awnings to reach the small balcony on the left, climb to the roof, and walk right toward the balloon. Bounce off it onto the office roof and open the suitcase.
A Combined Effort
A Combined Effort asks for the clothing that crosses over from other games. The three known crossover items are the Bing Bong Mask (from PEAK), the Hop Mask (from Big Hops) and the Piku Mask. At the time of writing nobody had confirmed whether that is the complete set, but finishing Playing Dress Up collects everything anyway.

Collect Them All
Collect Them All wants a photo of every compendium critter, 69 across the five regions. Each table runs in area order, so you can sweep an area at a time. A few critters only show up when you focus on something or do something first, and the notes say what.

Homelanda critters
| Critter | Where |
|---|---|
| Cow | Out in the open; you can pet it |
| Forest Bird | Out in the open |
| Fuzzpede | On the back wall of your house |
| Tato | On the mailbox |
Cropten critters
| Critter | Where |
|---|---|
| Flutter | [1], [12] |
| Chippick | [2], [6], [10] |
| Chick | [3] |
| Chicken | [3] |
| Farm Cat | [3], focus on the tiny flower (Missing Cat) |
| Rooster | [3] |
| Bee | [4] |
| Tato Bloom | [4] |
| Piglet | [5], [10], [12], later [3]; it has to be clean |
| Sheep | [5] |
| Blobnut | [6] |
| Skipbean | [6] |
| Tato Papillon | [8] |
| Puffléon | [9] |
| Slumberpod | [10], in the mill room |
| Farm Dog | [11], on Rabbit’s roof after the biscuit goes in the bowl |
| Tato Carrot | [11] |
| Spotted Cow | [12] |
Taletorp critters
| Critter | Where |
|---|---|
| Haunt | [2], the tavern’s haunted room; collect all six wisps first |
| Robin | [2], [12] |
| Tato Knight | [2], in the tavern beside the commander |
| Horse | [3] |
| Brigo | [4], asleep on the pile of bricks outside the wizard’s house |
| Frog | [4], in the house on the left |
| Tato Candle | [4], on the bookshelf in the wizard’s house |
| Mopeyrelle | [5], up on the boards |
| Fairy | [7] |
| Fluffoot | [7], in the cave |
| Tato Mineral | [7], in the cave |
| Crow | [8], [13] |
| Donkey | [8], later [2] |
| Flamo | [8] |
| Goat | [9] |
| Ratorb | [9], break the moving pot in the passage to the range |
| Bunny | [11], under the bridge |
| Draco | [11], in the dice chamber of the catacombs |
| Ferner | [11], up among the ferns |
| Slime | [11], second chamber of the catacombs maze |
Deltburg critters
| Critter | Where |
|---|---|
| Dance Bug | [2], rightmost locker in the Aquarium staffroom |
| Flying Fish | [2], Aquarium |
| Mollusc | [2], Aquarium; focus on the shell |
| Penguin | [2], Aquarium; pet one first |
| Pilcis | [2], Aquarium |
| Sea Bunny | [2], Aquarium |
| Seahorse | [2], Aquarium |
| Snotty Salmon | [2], Aquarium, after Feed a Fish |
| Sunfish | [2], Aquarium |
| Tato Eel | [2], Aquarium |
| Village Chirp | [2] |
| Seagull | [3], [12] |
| Pondling | [5] |
| Bichon | [6], in the old lady’s house |
| Skipfish | [6] |
| Pollypran | [7], singing in the water |
| Bookworm | [9], focus on the moving books on the shelf by the library door |
| Larvalto | [9], singing in the water |
| Pondaconda | [9], in the water across from the library |
| Tato Balloon | [9], on the library roof |
| Adulbass | [10], singing in the water |
| Poggy | [10], on the goal |
| Roaming Goby | [10] |
| Cosmonoid | [11], inside the professor’s dream |
| Tato Bunga | [11], surfing at the top of the waterfall |
| Tootbug | The sewers, from [6] or [12] |
Whirlhill critter
| Critter | Where |
|---|---|
| Tato Party | On the table behind the reporter |
Sightseeing
Sightseeing wants a photo of all five sights. Most have a plaque beside them that names the sight.

| Sight | Where |
|---|---|
| Home Sweet Home | Homelanda, your own house |
| Grand Sunflower | Cropten [8] |
| Cavern’s Light | Taletorp [7], inside the cave near the rope |
| Aquatic Ensemble | Deltburg [2], the fountain |
| The Whirling Birch | Whirlhill, once it has bloomed |
Leave Your Mark
Leave Your Mark needs a photo in five empty frames. Any photo will do. Six frames are listed below and any five of them count.

| Frame | Where |
|---|---|
| 1 | Homelanda, your room, right of the bed |
| 2 | Homelanda, your room, left of the computer |
| 3 | Homelanda, the dresser in front of Nana’s bed |
| 4 | Cropten [5], in the Shepherd’s house |
| 5 | Cropten [11], in Rabbit’s house |
| 6 | Deltburg [9], in the library next to the librarian’s desk |
FM Fantastic
FM Fantastic wants all 11 radio jingles. Touch each radio to collect its jingle.

| Region | Radio |
|---|---|
| Cropten [4] | In the clothing store |
| Cropten [9] | On a crate |
| Taletorp [2] | Haunted room in the tavern |
| Taletorp [2] | Rage room upstairs in the tavern |
| Taletorp [5] | Next to the devilkin bonking game |
| Deltburg [2] | Marine biologist’s office in the Aquarium |
| Deltburg [5] | Meditation room on top of the building |
| Deltburg [6] | The old lady’s house |
| Deltburg [9] | On the club stage |
| Deltburg [10] | The escape room |
| Deltburg [11] | Professor Bedhead’s house |
To the Top
To the Top is for the three Climbing Challenges, one per main region. Each one is a flag up high, then a word with Mountain Goat. The reward is the Mountain Goat Mask. Each region’s quest table above has a Climbing Challenge row with the way up.

| Region | Flag |
|---|---|
| Cropten [6] | Roof of the taller house |
| Taletorp [2] | Tavern roof, through the upstairs window |
| Deltburg [12] | Top of the tower |
Great Fall
Great Fall wants a long drop that ends with you landing standing up. At the time of writing, players have earned it by jumping from a Climbing Challenge flag spot straight down to the lowest ground. Which flag they jumped from is not recorded.

A Keen Eye
A Keen Eye is for the three Photo Challenges, each handed out by a Photo Scout. The reward is the Photo Challenger Fit.

| Region | What to photograph |
|---|---|
| Cropten [11] | A house that looks like a giant chicken. Look for a round window as the eye and an air conditioning unit as the beak; the house in [1] works. |
| Taletorp [12] | The trinkets in the bird nest near the top of the tower in [13]. Shoot it just before the last ladder. |
| Deltburg [11] | Three Village Chirps on the chessboard table in [2]. One sits on a bridge, one on a barrier on the left, one by the waterfall right of the Aquarium door. Walk up to each and it flies to the table. |
Stamp Savant
Stamp Savant is every quest in the game: the three in Homelanda, the full lists for Cropten, Taletorp and Deltburg above, and Whirlhill’s single quest (see Experience TOEM).
