Scapewatch Beginner Guide: Which Skills to Level
In Scapewatch: Idle MMO your character works through a queue of tasks on its own, so you have two jobs: decide which skills to push, and steer the queue so those tasks actually roll. Below is the order to level skills in, how to steer the queue, and a section for each skill you will be choosing between.
The short version: pick a combat style and level its two skills (Mine and Smith for melee, Forage and Craft for ranged, Invoke and Imbue for magic). Level Fish and Cook next to it, because that is your healing. Take Vigor tasks whenever one is close by. Then move on to Farm and Brew for potions. Plunder, Barter, Bard and Discover are optional and depend on what you want from the game. Spend your Skill Credits in Skills Customization so the skills you chose actually show up in your queue.
Skill priority at a glance
| Priority | Skills | What they give you |
|---|---|---|
| Must level | Your combat pair: Mine/Smith, Forage/Craft or Invoke/Imbue | Your weapons and armour, plus Force in Fortress raids |
| Must level | Fish/Cook | Healing food for combat, plus HP in Fortress raids |
| Very good | Vigor | Faster walking, faster skilling, faster attacks |
| Very good | Farm/Brew | Potions for combat stats, movement speed and task rewards |
| Up to you | Plunder | Gold, random resources and a chance at Thief’s Gloves |
| Up to you | Barter | Resources and rerolls for the Barter Tab |
| Up to you | Bard and Discover | Potions of Discovery and treasure chests |
The game has 15 skilling skills, 10 combat skills and 5 other skills (Slay, Delve, Fortify, Luck and Alms). Nothing here locks you out of anything. Every skill is a fair choice if it suits how you play, and this order is simply a sensible default for a new character.
Your first session: the task bar
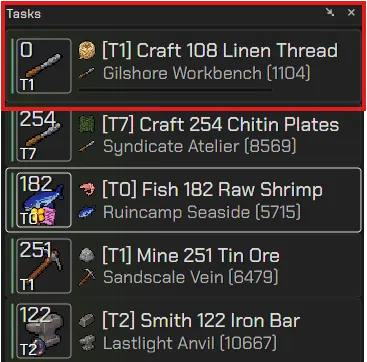
The task bar is the list of jobs your character has queued. Your avatar walks to the top entry, the active task, without any input from you. The number in brackets on the active task is how far away it is. On every entry below it, the bracket shows the distance from the task above, and you can drag those entries into a better order.
Rerolling tasks
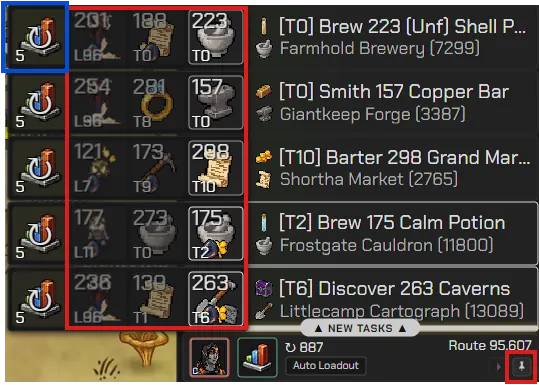
If you dislike the tasks on offer, click the thumbtack icon at the bottom right of the list. That expands every slot to 3 choices, which is also how you train one specific skill: look along each row for that skill’s task. Still nothing good? Reroll the expanded tasks for 5 reroll credits; your active task stays where it is. You earn 1 reroll credit per completed task.
Task colours and icons
| What you see on a task | What it means |
|---|---|
| Red task | You have none of the resources it needs. You can still run it for half XP and no materials. |
| Yellow task | You have some materials, but not enough for the whole task. |
| Yellow four-leaf clover | A Lucky Task (see Luck and Lucky Tasks below) |
| Blue book | A Diary task (see Location weighting and the Diary below) |
| Pages icon | A clue scroll location |
| Open book | A quest step. Greyed out means a later step. |
Walking in place
If your character is walking without moving, it has fallen out of sync with the server. Usually this is only visual and fixes itself once the server catches up. If it does not, refresh the game with Ctrl + Shift + R.
Skills Customization and Skill Credits
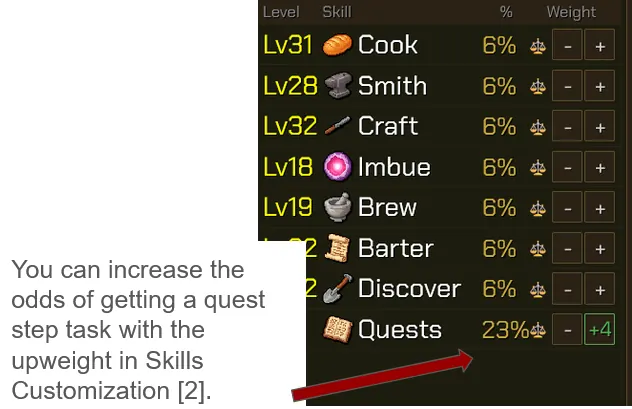
Open Skills Customization with hotkey 2. Press + on skills you want to develop and - on skills you would rather not see. The weighting changes the odds for every task you roll from then on, and you can undo it at any time to get the credits back.
Two kinds of credit pay for this. Skill Credits, spent in Skills Customization mainly on whole skills, come whenever you level up any skill. Each skill also has its own credits for weighting its tiers; the Mine screen, for example, shows Mine Credits. A completed task also pays a skill credit as part of its reward.
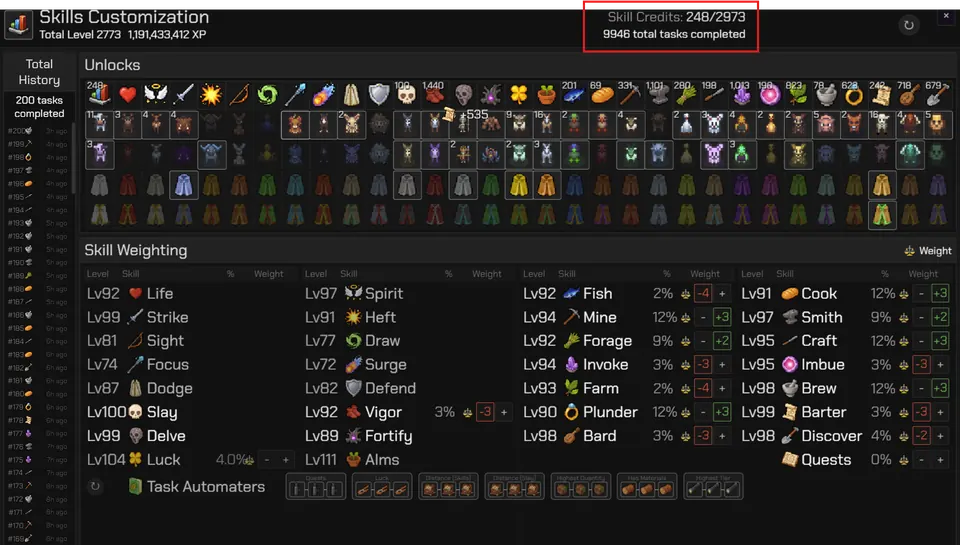
Each step of weight costs more than the last, in either direction. To weight tiers, click a skill in Skills Customization, then press + on tiers you want and - on the rest. Quantity sets how large a task of that tier can roll. Downweighting every Mine tier except T9, for example, makes T9 Mine tasks turn up much more often.
| Weight step | Skill weight cost (Skill Credits) | Tier weight cost (that skill’s credits) |
|---|---|---|
| 1st | 25 credits | 5 credits |
| 2nd | 50 credits | 10 credits |
| 3rd | 100 credits | 20 credits |
| 4th | 200 credits | 40 credits |
| 5th | 400 credits | 80 credits |
Task Automators
Task Automators decide which task gets picked when tasks roll while you are idle or offline. They sit in a row at the bottom of Skills Customization, and you arrange them in order: the leftmost one takes priority. They drop mostly from completing skilling and Slay tasks, and the Unlocks tab shows how each one drops.
Location weighting and the Diary
Some locations sit in a corner of the map or far from a bank, so you can spend Skill Credits weighting locations too. The location list sorts by name or by distance to the nearest bank, a number the task list itself never shows. A large distance is bad.
The Diary (hotkey R) has an entry for every area. A blue book on a task means it is your first visit to that location at that tier. Visit the same location with enough different tiers and you unlock up to 5 free weight points. A blue book icon in Skills Customization tells you free diary weight is waiting to be spent.
Pick a combat style: Mine/Smith, Forage/Craft or Invoke/Imbue
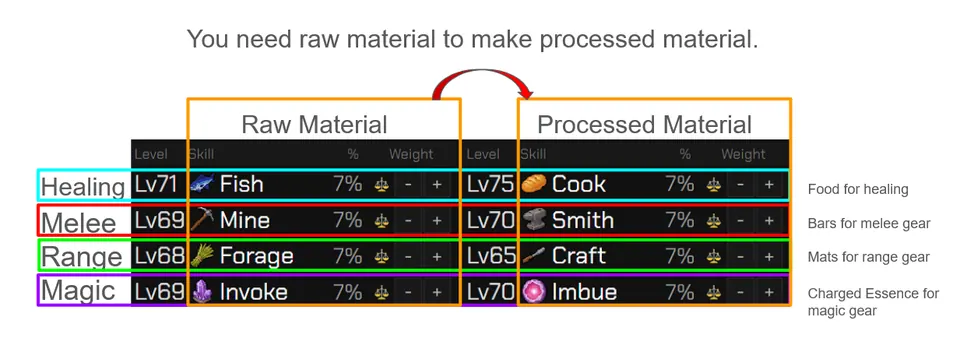
These six skills are the core of every account, and the combat style you want to use decides which pair you focus on. Each pair works the same way: the first skill gathers the raw material, and the second turns it into a processed material that you then use in the crafting menus.
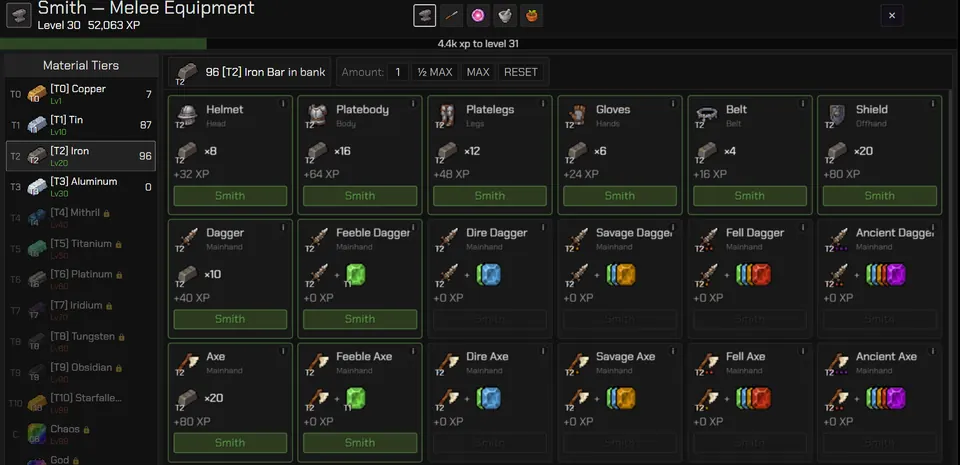
Mine and Smith (Melee)
Mine gathers ores, and Smith tasks turn them into metal bars. In the Smithing tab (hotkey 6) you spend the bars on melee equipment, which earns more Smith XP. Melee does not burn through ammo. Its ammo is a whetstone, and you only craft it once. To craft one, first get the whetstone blueprint, a rare drop from monsters. Crafting it also needs a high enough Alms level.
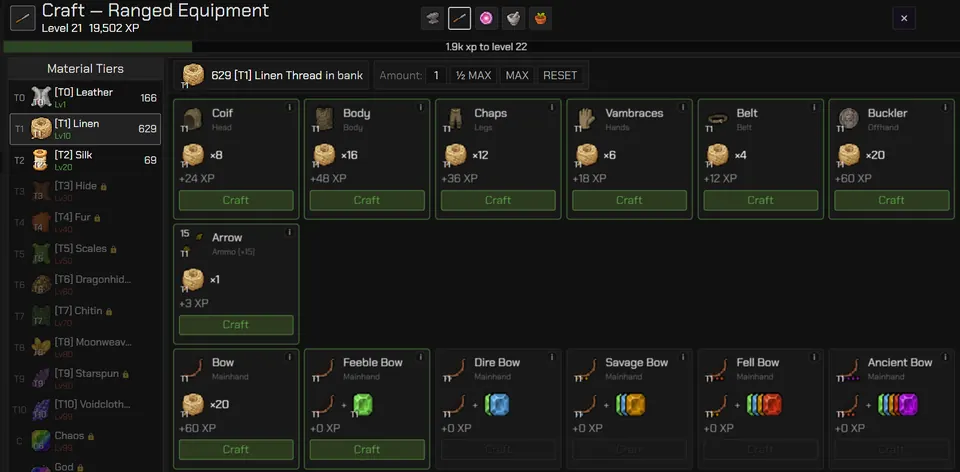
Forage and Craft (Ranged)
Forage gathers the raw materials, and Craft tasks turn them into processed materials. In the Crafting tab (hotkey 7) you make ranged equipment and ammo from those materials for more Craft XP.
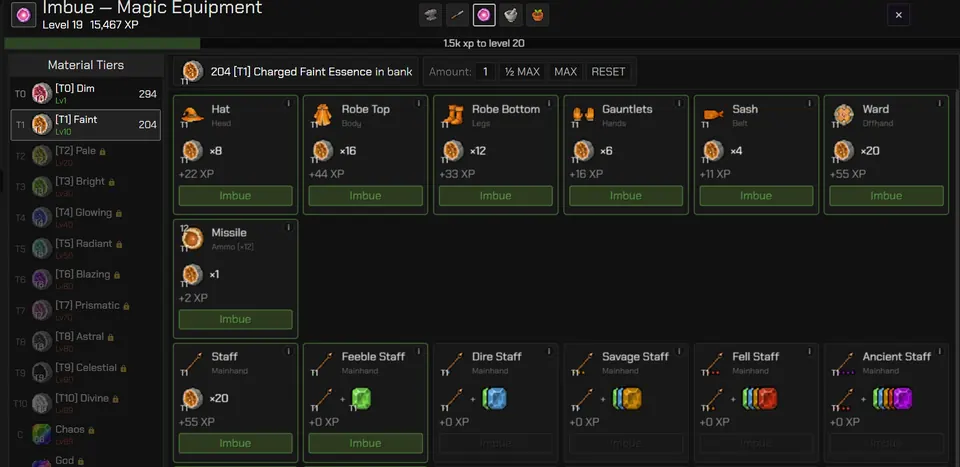
Invoke and Imbue (Magic)
Invoke gathers crystals, and Imbue tasks turn them into Charged Essence. In the Imbue tab (hotkey 8) you make magic equipment and ammo from the essence for more Imbue XP.
Ranged and magic need a lot of ammo. Once you have enough, it can pay to hold back some materials for the Barter Tab, where you may roll an offer to buy a piece of equipment that you can then craft and sell.
Upgrading weapons with gems
Every tier of weapon can be upgraded with gems to raise its damage. Gems drop from the matching monsters on Slay tasks: Feeble gems from Feeble monsters, Dire gems from Dire monsters, and so on. Each upgrade is its own recipe in the equipment tab, made from the weapon one step below plus gems. Taking a dagger all the way to an Ancient Dagger goes like this:
| Upgrade | Gems added at this step |
|---|---|
| Dagger to Feeble Dagger | 1 Feeble |
| Feeble Dagger to Dire Dagger | 1 Feeble, 1 Dire |
| Dire Dagger to Savage Dagger | 1 Feeble, 1 Dire, 1 Savage |
| Savage Dagger to Fell Dagger | 1 Feeble, 1 Dire, 1 Savage, 1 Fell |
| Fell Dagger to Ancient Dagger | 1 Feeble, 1 Dire, 1 Savage, 1 Fell, 1 Ancient |
| Total for an Ancient weapon | 5 Feeble, 4 Dire, 3 Savage, 2 Fell, 1 Ancient |
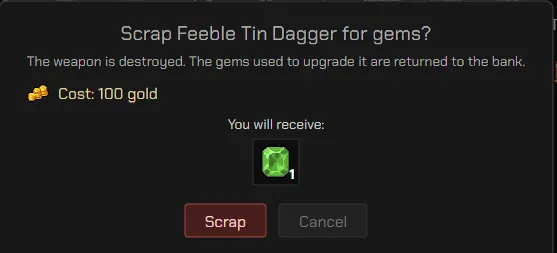
Spend gems freely. Right-click a weapon and scrap it, and the gems you put into it go back to your bank. Scrapping costs gold (100 for a Feeble Tin Dagger) and destroys the weapon.
Fish and Cook
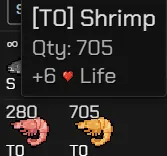
Every player needs Fish and Cook, because cooked fish is the best healing you can bring into combat. Fish tasks catch raw fish and Cook tasks turn them into the cooked version. Higher tiers of fish heal much more, and tier for tier, cooked fish heals far more than the Life Soup that Brew can make.
Vigor
Vigor makes you faster at everything. Its levels raise movement speed, cut attack cooldown and shorten skilling actions. Vigor tasks also drop Jars of Sweat, the ingredient for movement speed potions. Vigor tasks are worth taking whenever one rolls nearby. To see the exact breakdown, open the Unlocks tab and hover over the Vigor icons.
Farm and Brew
Farm and Brew supply your potions, which add combat stats, extra task rewards and movement speed. Farm tasks gather herbs. Brew tasks turn those herbs into unfinished (Unf) potions of the matching type, and the Brew tab (hotkey 9) finishes each one by adding resources from other skills. Finished potions take their herb’s name, such as a [T2] Skirmish Potion or a [T2] Shell Potion.
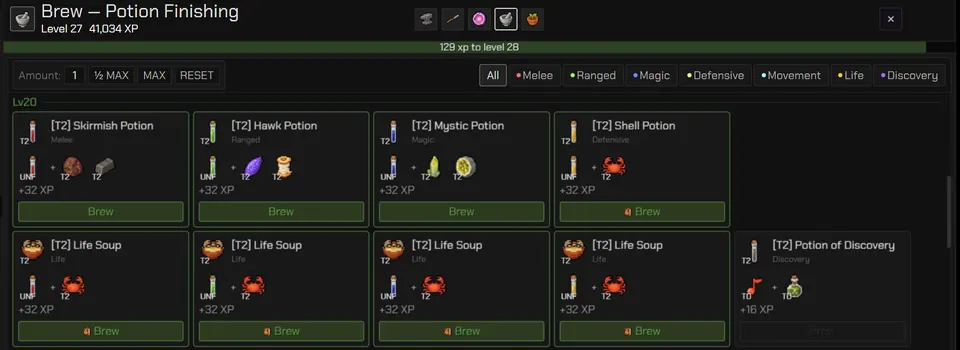
| Herbs | Colour | Boosts | Finish the (Unf) potion with |
|---|---|---|---|
| Skirmish, Battle, War | Red | Melee stats | An ore and a bar |
| Hawk, Eagle, Condor | Green | Ranged stats | A Forage material and a Craft material |
| Mystic, Arcane, Cosmic | Blue | Magic stats | Crystal and Charged Essence |
| Shell, Barrier, Fortress | Orange | Defence stats | Raw fish |
| Calm, Serene, Tranquil | Light blue | Spirit | Nothing: the Brew task gives the finished potion |
| Swift, Fleet, Haste | Yellow | Movement speed | Jar of Sweat (from Vigor) |
Two Brew recipes sit outside the herb lines. Any (Unf) potion plus raw fish makes Life Soup, a backup food. The Potion of Discovery is covered under Bard and Discover below.
Plunder
Plunder is one of the main early sources of gold. Each task pays gold plus random resources of the same tier as the task, so a T0 task gives T0 resources. There is a small risk of losing some HP, and a very unlucky run can kill you, so keep a little food ready.
Plunder can also drop Thief’s Gloves. At the time of writing no other gloves in the game beat them. The drop rates get lower the higher the tier you plunder, and you can check them in the Collections tab.

Barter and the Barter Tab
Barter tasks spend your gold on resources, and the stall decides what you get: a T0 Fish Stall sells raw and cooked fish, a T1 Forage Stall sells leather and other Craft supplies, and so on up the tiers. While a Barter task runs, all of your gold leaves the bank, so you cannot donate to Alms or use the Barter Tab until it finishes.
Barter tasks can also drop almanacs. Two of them make Farm and Brew weighting easier:
| Drop | Effect |
|---|---|
| Farmer’s Almanac | Every Farm weight point counts for 1 more |
| Brewer’s Almanac | Every Brew weight point counts for 1 more |
Barter Tab
The Barter Tab (hotkey /) is a second way to make gold by buying and selling spare resources and equipment with the game. It starts working at Barter level 10, after you reroll once, and gains more slots at levels 20, 40, 50, 70 and 80. Rerolling uses barter reroll credits, which only Barter tasks give you. Each reroll costs 10 credits and replaces every slot at once, so do not waste them. Higher tiers sell for more, and equipment sells for the most.
What can appear is capped by your Barter level and by the level of the skill that makes the item, whichever is lower:
| Barter | Fish | Fish you can roll |
|---|---|---|
| T1 | T2 | T1 only (Barter caps it) |
| T2 | T1 | T1 only (Fish caps it) |
| T2 | T2 | T2 |
Hover over the scroll at the top left of the tab for the full rules. On any offer, a green number is a good price and a red number is a bad one, whether you are buying or selling.
Bard and Discover
Bard tasks can pay gold, Barding Notes and treasure scrolls. Discover tasks can drop Jars of Dirt and can complete a step on a treasure scroll you are carrying. Both work across a range of scroll tiers: a T5 Bard task can drop scrolls from T0 up to T6, and a T5 Discover task can complete steps on scrolls from T0 up to T6. Otherwise you finish a scroll step by walking through the location it names, or by doing a task there.
Barding Notes and Jars of Dirt are brewed into Potions of Discovery at Brew levels 20, 50 and 80. A Potion of Discovery doubles what a finished task pays: 2 reroll credits instead of 1, double skill credits, and double the chance of an automator drop. The T5 and T8 potions also add extra loot when you open chests.
Alms
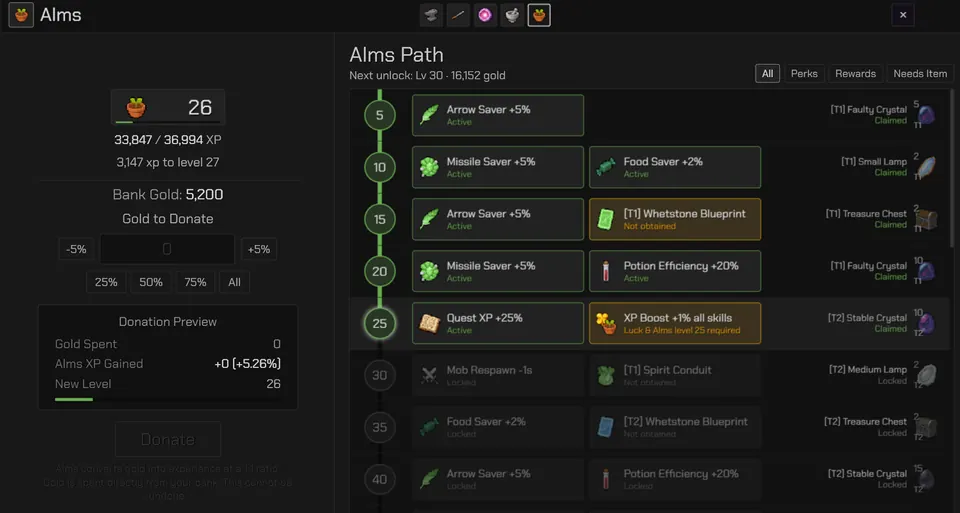
Alms turns gold into permanent passive bonuses and item rewards. You level it by donating gold or completing quests. Its bonuses include:
- Quest XP bonus
- Faster mob respawn
- Food saver
- Ammo saver
- Loot quantity (tied to your Luck level)
The complete list of bonuses is on the Alms page (hotkey 0), or near the bottom of the Unlocks page. Rather than spending gold as it comes in, put it toward Alms levels, and keep some back for any bartering you plan.
There is no trading between players, so gold comes from quest rewards, Plunder tasks, monster drops on Slay, the Barter Tab and opening chests.
Combat: Slay and combat skills
At the time of writing, all combat counts as Slay, because the old way of fighting outside Slay has been removed. Drops labelled “only drops when a slay task is active”, or “slay task only” in Mob Selection, can therefore drop in any fight.
Combat skills
| Skill | What it does |
|---|---|
| Life | Your HP |
| Spirit | A combat resource. Each of your attacks costs 2, and each hit that damages you costs 1. While it stays above 0, all combat stats get +20%. Each kill refills 10% of your max Spirit. |
| Strike / Heft | Melee accuracy / melee power |
| Sight / Draw | Ranged accuracy / ranged power |
| Focus / Surge | Magic accuracy / magic power |
| Dodge | Makes enemy attacks miss you |
| Defend | Reduces the damage you take from hits |
Life and Spirit rise on their own as you fight. Training an accuracy skill also trains Dodge, and training a power skill also trains Defend. Accuracy above 100% turns into a higher minimum hit.
Starting a Slay task
To start a Slay task, click the skill toggle until the skull is showing. That puts your Slay task in the active slot. To equip gear, left-click it in the bank to put it in your loadout, or click an equipment slot to see everything that fits it. Combat default loadouts live under Esc (or the settings button at the bottom left), then Combat Defaults at the top.

Mob weakness and weapon types
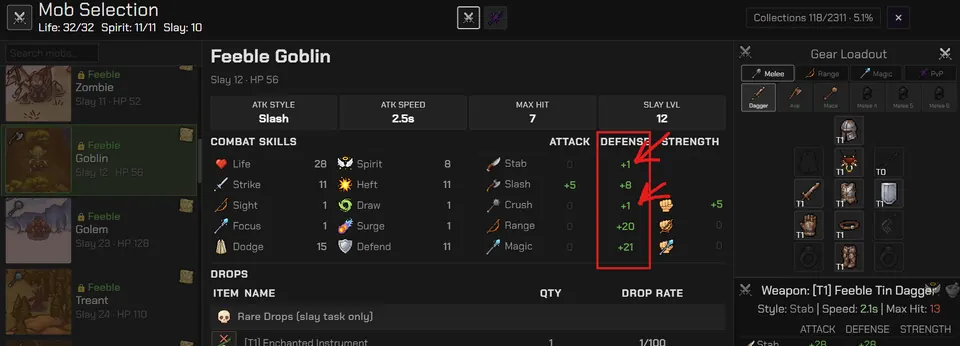
Open Mob Selection (hotkey 4), pick a monster and look at its defence values. Use a weapon whose damage type hits its lowest defence:
| Lowest defence | Weapons that hit it |
|---|---|
| Stab | Dagger (melee), Crossbow (ranged) |
| Slash | Axe (melee), Wand (magic) |
| Crush | Mace (melee) |
| Range | Bow (pure ranged) |
| Magic | Staff (pure magic) |
Rage Slime is weakest to slash and magic, so an axe, staff or wand works best. The Feeble Goblin has its lowest defence against stab and crush, so pick a dagger, mace or crossbow.
Food, potions and auto-eat
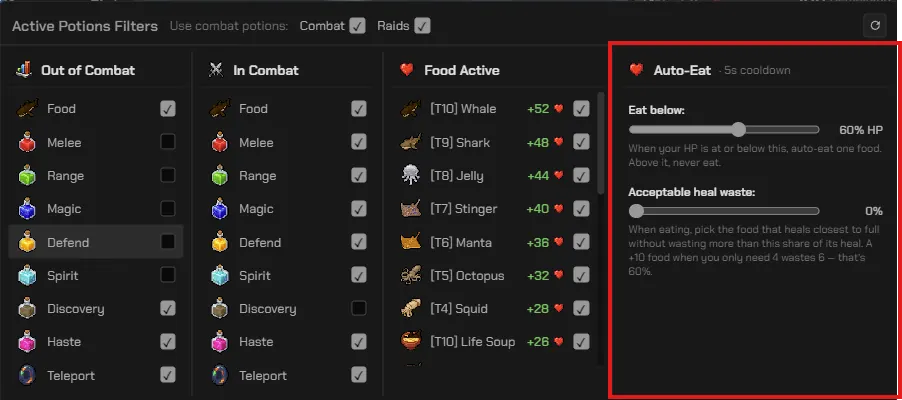
Food is eaten straight from the bank, so there is nothing to equip. Potions are different: left-click one in the bank to use it. Right-click the food icon at the top right of the screen for the settings menu, where you can switch eating and potions on or off, hide their icons from the screen (they are still used while switched on), and tick which foods count as Food Active.
Eat below sets the HP level that triggers eating a food. Around 60% suits Slay, where you should not be killed in one hit. For raids, start near 90% and lower it once you see how hard you are being hit. Acceptable heal waste is how much overhealing you tolerate; at 0% the game never eats food that would take you above full HP.
Slay levels and drops
Your Slay level goes up as you kill monsters. Higher levels unlock more monsters that give more Slay XP, and eventually a new tier of monsters through Slay Masters. Every monster has its own unique drops with strong bonuses and stats. Check them in Mob Selection (hotkey 4) or in Collections.
Quests
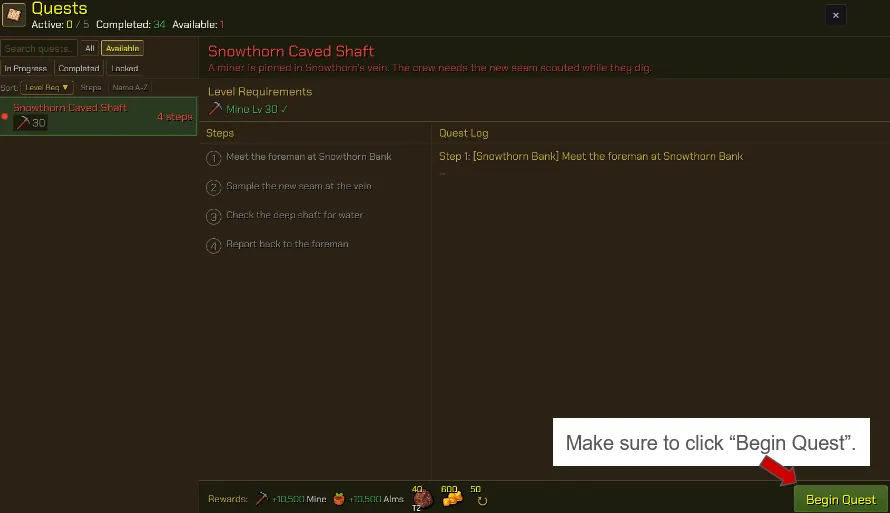
Quests sit in the Quests tab (hotkey 3). Once you begin a quest, every new task or reroll has a chance to be a quest step, which asks for a specific task type at a specific location. Steps go strictly in order: step 1 must be done before step 2, and so on.
Quest stacking
Quest stacking means filling your whole queue with quest steps so you stay in one location instead of walking between them. To set it up, weight Quests up in Skills Customization and reroll until the quest tasks appear.
Luck and Lucky Tasks
Any task can roll with the lucky modifier, marked by the yellow four-leaf clover. A Lucky Task gives:
- 2x XP
- 2x actions completed per tick
- 2x completion rewards (reroll credits, skill credits, and the chance of Task Automator and telescope drops)
- No fails
A Potion of Discovery stacks on top of this. As a rule, a Lucky Task one tier below your best tier beats a normal task at your best tier: T5 lucky gives more than T6 normal. The gap cannot be too wide, though: T6 normal still beats T2 lucky.
Luck XP comes from:
- Doing Lucky Tasks
- Gathering an item from a task for the first time
- Crafting an item for the first time
- Rare drops from monsters
- Almost everything in Collections
When to use lamps
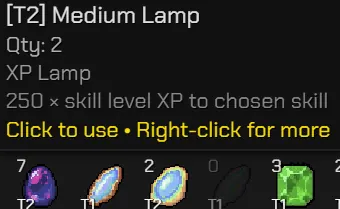
XP lamps give XP equal to a multiplier times your current level in the skill you choose. The [T2] Medium Lamp, for example, gives 250 times the skill level, and the lamps go 100, 250 and 500. That means the same lamp is worth more the later you use it, though using one to cross into a new tier is also a fine choice. The black combat lamps give a flat amount of XP, so you should use those whenever you like.
Raids: Dungeon Raids and Fortress Raids
Press U to open the Raids screen. Dungeon Raids (Combat) are on the left and Fortress Raids (Skilling) on the right. In both you team up with 4 other players: a Dungeon Raid is a combat run, and a Fortress Raid means defending a fortress against waves of enemies.
This is where the priority list pays off a second time. In Fortress Raids, HP comes from Fish/Cook, Force comes from your combat pair, and Defence comes from Farm/Brew. T1 means level 10 in both skills of a pair (level 10 Mine and level 10 Smith make T1 melee Force), T2 means level 20, and so on. In Dungeon Raids, T1 gear means gear of that tier, and T1 stats means level 10 in your combat skills.
Delve and Fortify
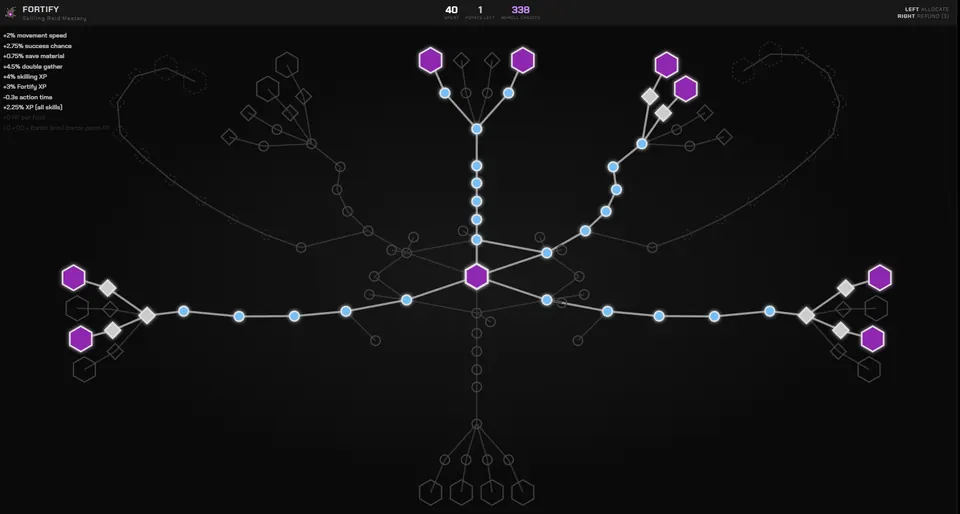
These are the two raid skills. Dungeon Raids give Delve XP and Fortress Raids give Fortify XP, with the amount based on how much you contribute. Every Delve or Fortify level gives you a point to spend in that skill’s tree (press T for the Delve tree and Y for the Fortify tree). The perks apply everywhere in the game, not only inside raids. Resetting a skill tree to get the points back costs reroll credits.
What you can skip early
- Clans add no gameplay benefit. They are there for company, the clan hiscores and fun. Clan PvP exists but, at the time of writing, rewards nothing.
- PvP only counts toward the leaderboard at the time of writing, with no gameplay bonus or cosmetics.
Hotkeys worth learning
| Key | Opens |
|---|---|
| 2 | Skills Customization |
| 3 | Quests |
| 4 | Mob Selection |
| 6 / 7 / 8 / 9 | Smithing / Crafting / Imbue / Brew tabs |
| 0 | Alms |
| / | Barter Tab |
| M | World Map, showing your task route |
| R | Diary |
| Q | Unlocks (green book) |
| E | Collections (red book) |
| U | Raids |
| T / Y | Delve / Fortify skill trees |
Most “what does this do” and “where does this drop” questions are answered by hovering over the item in Unlocks or Collections. Filling the Collection log also raises a buff, which the Unlocks tab lists under its own red book icon.