House 2: All Achievements and Endings
House 2 has thirty achievements, and the last one on the list, Completionist, only fires once the other twenty nine are done. This page has a section for every one of them, plus every ending, and what each one takes. The one gap is the desert: this page does not cover how you first get out there, only what to do once you are.
The short version. The house runs on loops that end at midnight, and on a hidden Tendency meter that swings Pure when you save people and Corrupt when you kill them. Six endings sit on top of that, and the last of them needs four of the others done first. Everything else is phone numbers, collectibles, deaths and counters you can chip away at in any run.
One warning first. This page spoils House 2 from top to bottom, including both hidden areas and what waits in them. The game is far better blind, so if you have not finished a run yet, close this and come back when something has you stuck.
The six endings
Each ending is named here by the achievement it hands you.
| Achievement | The ending | What has to come first |
|---|---|---|
| Survivor | You kill Daddy yourself | Nothing |
| Savior | You get everyone out alive | Nothing |
| Butcher | You kill everything in the house | Nothing |
| Babysitter | You save Suzie from the clown | One other ending |
| Nihilist | You let go, out in the mud world | A fully corrupt house |
| Heartless | You break free of the loop | Survivor, Savior, Butcher and Babysitter |
How Tendency works
Tendency is the hidden state of the house and it moves with what you do to the people and animals in it. It decides which characters turn up, which endings are open to you, and how the house treats you generally.
The tree painting in your bedroom is the readout for Tendency.
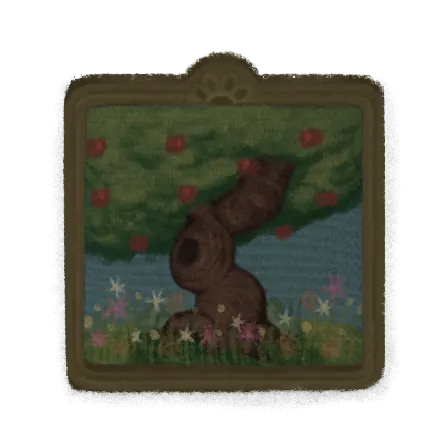

You need both ends of the meter for the full list, so the plan is to push the house one way, take everything that state gives you, then push it back the other way.
Pure
Pure is the bright end of that meter. Bringing light into the house means one thing: keep saving people, repeatedly, until the painting in your room is green and bearing fruit. There is no shortcut and no separate trigger.

Corrupt
Corrupt is the other end. Bringing darkness into the house is the same job in reverse: keep murdering people, repeatedly, until the painting is a dead black tree.

You Rang?
You Rang? asks you to find the Spirit Bell, and a monster is holding it. Get the meter pinned at either end first, because both work. In a pure house, the ghoulish figure down in the basement hands the bell over. In a corrupt house you can take it off the mud man out in the backyard instead, by setting the anvil under him and letting the lightning hit.

Who Is She?
Who Is She? is Marnie the snail. Once the house has gone corrupt, a second snail turns up in the backyard, and that is her. Pick her up and talk to her across a few loops and she moves into your room, which is the achievement.

Guardian
Guardian is the family only: Melody, Lois and the cat. Save those three in one loop and it pops, whether or not the dog, the rat and Majesty make it. The Melody, Lois and Cat rows in the table under Savior have the method.

Savior
Savior wants everyone through the loop alive: Lois, Melody, the cat, the dog, the rat, and Majesty the horse up in the attic. Do all six in one loop and Guardian lands at the same moment.

| Who | How to save them |
|---|---|
| Melody | Mop up the cat pee at the head of the stairs, do the dishes, and flush the thing in the toilet |
| Lois | Bring the anvil up from the basement, smash the attic hatch with it, then knock the chandelier down with the baseball |
| Cat | Feed the dog first, then set off the bear trap in the basement. Throwing the baseball from the doorway is the easy way |
| Rat | Three hazards in three places: set off the mousetrap upstairs in the room that leads to the attic, knock the spider out of the closet downstairs, and get the kitchen knife down before he runs under it |
| Dog | Feed him, as under Animal Husbandry below |
| Majesty | Feed him the same way |
Killer
Killer is the family three again, dead instead of alive: Melody, Lois and the cat, all in one loop. Lois is down in the living room and Melody is upstairs in her room, and the knife is all either of them needs. The cat dies under the anvil, or under the hanging plant in the upstairs hallway if you hit the plant with the baseball as it passes below.

Butcher
Butcher wants everything in the house dead in a single loop: Lois, Melody, the pizza delivery guy, the cat, the dog, the snail, the goldfish, Majesty, the rat, the doll and the spider. This route keeps the walking down:

- Take the baseball.
- Call 888-8888 on your way to the basement so the driver is already coming.
- In the basement, throw the baseball and pick up the anvil.
- Set the anvil down in the kitchen and pick up the knife.
- Drop the anvil on the cat.
- Stab the pizza driver when he turns up.
- Upstairs for Melody, the snail and the doll. The doll is in the clown room and it has to be done before 8 or 9pm.
- Back downstairs, throw the baseball to drop the spider and stomp it, then the living room for Lois and the goldfish.
- Carry the anvil back for the rat.
- In Lois’s room, take the gun and two rounds out of the safe.
- Down to the basement for the dog.
- Last stop is Majesty in the attic.
Then wait until midnight for the ending to play.
If Majesty is being difficult, the gun settles it, or you can feed him pizza and stab him while he eats. The dog also dies to the anvil when the clock hits 7.
Survivor
Survivor is the ending where you kill your father yourself. Do not save the whole household and do not kill the whole household, because either one locks you into a cutscene ending instead of the fight. Stay alive, let the loop run to midnight, and win.
The knife is all you actually need. Everything else is optional.

Food and a snail will buff you:
| Buff | What it does |
|---|---|
| Pizza | Knife damage |
| Pie | Stamina |
| Marty | Movement speed. Marty is the snail the house starts with |
| Marnie | Knife damage. Corrupt house only, see Who Is She? above |
The gun, the knife and every round in the house:
| Where | What is in it |
|---|---|
| The safe in Lois’s room | The gun and two rounds. The code is 324 as of the launch build, written a digit at a time in Suzie’s old room, the basement and the backyard |
| The kitchen | Set the anvil down and the knife shakes loose |
| The vase in the basement | A round |
| The vase in the attic | A round |
| The suitcase in the attic | A round, if you stab it |
| The backyard trash can | A round |
| The flowered plant by Melody’s door | A round, if you stab it |
| The room next door to the kitchen | A bullet |
| The cat | Two rounds, knocked off a shelf, if you keep it alive all the way |
Or you can let the house do the work:
- Re-arm the bear trap in the basement and lead him onto it.
- Carry the anvil out to the backyard and let the lightning hit him.
- Throw the baseball at the hanging plant in the upstairs hallway as he walks underneath on his way to you.
Independent
Independent is the same fight with the training wheels off. Kill Daddy with the knife, and the gun if you want it. Nothing else: no food buffs, no snail, and nothing the house drops on him.

Babysitter
Once you have one ending behind you, the television in the living room starts showing a clown waving you closer after 8 or 9pm. Interact with the TV, go in, and kill the clown to save Suzie. The knife is enough here too, and the same buffs and ammo listed under Survivor carry over if you want them. The clown has a second phase, so the fight is not over when it looks over.

Nihilist
Nihilist is the ending where you let go. With the house corrupt, an apple turns up in the bathroom. Eat it and you drop into the mud world, and the rest of it is the fight in the next section.

Giga Tabby
Giga Tabby is the boss of the mud world, and beating her is what closes the Nihilist ending. Killing her outright is a long fight, so use the map instead. Three stationary growths sit out there, one to the west, one to the north and one to the east of the spawn, and every one you destroy takes a large chunk out of her health.
Two things make the trip between them easier. There is a mouth in the ground that bites your legs off, so clear that before you start moving around. And come back to the grass patch at the spawn after each growth, so you always know which way you are pointing.
Heartless
Heartless is the ending where you break free, and it comes last because the four endings named in the table at the top have to be done first. After that you can throw a baseball at the clock, and you end up somewhere new with a heart pinned down by four chains. Break all four and the heart can be killed:

- Anvil onto the mouth out in the backyard.
- Stab the brain in the attic.
- Bait the hand in Lois’s room into dropping down, then cut its fingers off one at a time.
- A second hand, in Tabby’s room, goes the same way. Where that room is has not been pinned down, so expect to hunt for it.
Straight From a Horse’s Mouth
Majesty is the horse who lives in the attic, and meeting him is its own achievement. Go to the room opposite Melody’s and open the wardrobe. A clown balloon falls out of it, so stab that, then climb the ladder behind it. Put a pizza or a cooked pie in his plate and he will talk to you. As of the launch build, players also report the achievement firing when Majesty eats them instead, so either way through works.

Feeder
Feeder is the rat’s payoff. You do not hand him any food. What you do is keep him alive past all three of his hazards, which are in the Rat row of the table under Savior, and then go and find him again up in the clown room. At the time of writing it tends to pop when the loop finishes rather than the moment you reach him.

What Was That?
Walk into the kitchen from the living room after 9pm and, now and then, a man appears at the kitchen window and takes a picture of you. That is the whole encounter. It does not fire every loop, so keep passing through the kitchen at night.

Immortal
Immortal wants you to have witnessed every possible way to die, and the way to farm it is to die to anything new you meet. The log runs to twenty two entries. Four names come up twice in it, so the bracket says which one is which.

| Death | How it happens |
|---|---|
| Eaten alive | Step into the television at night and the clown swallows you |
| Inflated | The clown’s second form pumps you up until you burst |
| Chomped (Lois) | On a loop where Lois is dead, her head floats around after dark and bites |
| Drained (Lois) | Die to the monster in the bed after 9pm and Lois drains you |
| Stabbed (Daddy) | Lose the fight at midnight |
| Zapped | Stand outside holding the anvil and let the storm find you |
| Put on display | The coat rack roams at night and mounts you on it |
| Chomped (Majesty) | Let the hungry horse in the attic eat you |
| Split | The roaming shadow tears you in two after dark |
| Squished | Get flattened under the refrigerator at night |
| Flushed | Let the thing in the toilet grab you once it is past 8pm |
| Throat removed | Leave the basement dog unfed and it takes your throat |
| Stairs | Slip in the puddle of cat pee upstairs |
| Crippled (bear trap) | Walk into the armed bear trap downstairs and lose your legs |
| Stabbed (thrown knife) | A thrown knife catches you in the dark |
| Impaled | A spike trap runs you through at night |
| Crippled (floor mouth) | The mouth in the ground eats your legs during the Nihilist ending |
| Popped | On a loop where Melody is dead, a high note in her room bursts your head |
| Hung | On that same loop, a noose strings you up at night |
| Carried away | A sandstorm picks you up out in the desert |
| Drained (mummy) | A desert mummy drinks your soul |
| Beheaded | A swinging axe out in the desert takes your head off |
Scribe
Scribe asks for every journal entry, and there is nothing to hunt down separately. The entries come in as you do everything else on this page, so it will almost certainly unlock on the way to Completionist without you doing anything for it.

Caller
Caller is call every number, at least once each. There are ten.

| Number | Who answers | Where you find it |
|---|---|---|
| 911 | The police | No note needed, just dial it |
| 411 | Local emergency services | No note needed, just dial it |
| 888-8888 | The pizza place | Melody’s TV |
| 777-7777 | The fortune teller | Melody’s TV |
| 666-6666 | An exorcism service | The devil’s number, so you can guess it |
| 555-7387 | Majesty’s farm | Attic, on a newspaper with a dog on it |
| 364-2559 | Your neighbour | The drawer in Lois’s nightstand |
| 438-7424 | Unlisted | Stab the suitcase in the attic and part of the number can drop out |
| 867-5309 | Unlisted | From the song Jenny by Tommy Tutone |
| 332-3483 | Unlisted | Pulled out of the game files. As of the launch build, nobody has found it written anywhere in the house |
Donut Call Again
Ring 911 three times inside a single loop to annoy the cops. As of the launch build a few players needed a fourth call before it registered, so keep dialling if three does nothing.

Customer
Customer is ten pizza orders. Ring 888-8888, wait for the driver, and do it again. They do not have to be in the same loop.

Consumer
Consumer wants every collectible in the game. Most of them come out of boxes that spawn on high shelves, which you knock down by throwing the baseball at them. There are three shelves worth checking every loop:
- The small room or closet downstairs, off to the left of the staircase, the one the spider lives in.
- The closet in Lois’s bedroom.
- The second basement room, where the cat ends up if you save it.
That spawn is random, and it gets better the further the house leans Pure. Eating a banana also improves your luck, so it is worth one before a shelf run. Bananas come out of the backyard trash can when you stab it or hit it with the baseball.
The twelve below are the collectibles that do not come out of a box, so they are the ones you have to go and get on purpose. The boxes hold the rest.
Crystal Ball. Call the fortune teller on 777-7777 and keep calling until she has run out of lines to say.

Chicken. Hit the grill in the backyard until it opens. There is an egg inside it, so set the anvil down by the grill and wait for the lightning to strike.

Toilet. Flush the toilet again and again until it drops. It is a random drop, so it can take a while.

Mud Man. During the Nihilist ending there is a chest in the north east of the boss arena. Lure Giga Tabby over to it and let her smash it open. This is a separate thing from the mud man out in the backyard.

Sun Totem. Step on all six Sun plates, then go through the Sun door. The totem itself is at the north end of the map.

Moon Totem. Step on all six Moon plates, then go through the Moon door. The totem itself is at the south end of the map.

Hourglass. Out in the desert, down the ladders near the swinging axes. The exact spot is loose, so sweep that area.

Suzie. In a box on the vanity in Lois’s bedroom, on your left as you walk in.

Trash Can. A random drop from the backyard trash can. Line your feet up with the bottom of the stick on the ground and throw the baseball, and it will keep hitting the can on its own.

Burger. Sometimes when you slip and fall in the backyard, a fat ghost turns up to laugh at you. Kill him with the Spirit Bell.

Frog. A frog occasionally hops around the backyard. Squash it with the anvil.

The Network. Stab the suitcase up in the attic and it drops out at random. Keep stabbing.

Getting around the desert
Once you have been out to the desert and come back, a necklace turns up in the backyard, and if you have already picked it up it will be sitting on your desk. Interacting with it moves you between the house and the desert whenever you like.
Everything worth finding sits either in the middle or around the edges, so navigate by zone.
| Zone | What is there |
|---|---|
| Centre | The main entrance, the gate, a rock, and the way in to the yellow gem |
| Top left | The sand piles, and the hole between them once the grate is open |
| Top centre | The sun tent |
| Top right | The rocks with the giant, and the second useful hole |
| Right | Rocks, and the way in to the red stone |
| Bottom | The pools of water |
| Bottom left | The forest |
| Bottom right | Nothing much |
The landmarks that actually read at a glance are the water pools, the forest, the rocks and the clusters of sand piles. The gem fragments on the ground work as signposts on top of that.
| Gem fragment | Where it leads |
|---|---|
| Red | The cave with the secret door in it |
| Green | The forest |
| Blue or yellow | Back toward the middle |
Underground is a second map laid over that one, and the thing to memorise is which hole in which zone comes out where. Two of them do most of the work:
- The hole with the four gems, in the centre.
- The hole at the top right, which you can also reach from the hole between the sand piles at the very top left once the grate is open.
Between those two you can get everywhere except the dead ends, like the yellow gem hole and the Water Temple.
Sun and Moon plate locations
Six Sun plates, five of them out on the surface and the last one reached from below:
- Next to the giant’s feet. To get to the giant, go back to the far top left where the sand piles are, enter the cave there, and take the exit just before the gate.
- Still in the far top left, hidden in the sand piles to the left of that same cave entrance.
- From that plate, head down to a cluster of small sand piles with one plate in the middle. Trigger it with the tornado or by dropping a rock on it.
- Far bottom right by the pools of water, where four large rocks sit around a small sand pile. The plate is under the pile.
- From the centre, walk toward the entrance to the yellow gem area. Just to the right of it, large rocks form a semicircle with a plate inside.
- Track the blue gem fragments down through the tunnels, then take the upper entrance instead of carrying on into the big blue chamber. It leads to the exit and the last plate.
Six Moon plates, all of them below ground and mostly needing a stone:
- From the boy by the fire, carry a stone to the far bottom left. A small sand pile sits between four larger ones, with a plate under it.
- Same area, go through the gate on the far right and head down until candles are everywhere. There are side entrances left and right, with one plate on each side. That is two of the six.
- Keep going all the way down from the candle room and you reach a room full of spikes. One plate is at the very top, near a mummy.
- Another is by the blue gem in that room. There is one spot where the spikes can be threaded, and that is your way in.
- The last one is only loosely pinned down. It is in a narrow, elongated room with one or two mummies in it, right at the back on the right, past the exit.
Animal Husbandry
Put food in the dog’s plate down in the basement. Either a pie you baked or a pizza you ordered on 888-8888 will do.

Baker
The pie sits in the refrigerator in the kitchen. Take it out, put it in the oven to the left, and repeat until you have baked ten of them.

Maid
Clean up fifty messes with the sponge. Cat pee, water from the refrigerator, blood, clown juice and the dishes all count, so grab anything you walk past.

Exterminator
Squash fifty bugs. Roaches, grubs and mealworms all count, and you just step on them. Grubs only appear while the house is corrupt, and mealworms drop off Giga Tabby during the Nihilist ending, so a corrupt run is the fast one.

Masochist
Die twenty five times. Immortal’s log accounts for twenty two of them, so three more deaths of any kind finish this one off, repeats included.

Gamer
Beat Kimiko’s Curse 2. You can play it through in the prologue or in the epilogue, so there is nothing to miss here and no reason to rush it on your first loop.

Glutton
Eat all three foods in the same loop: the pie you baked from the refrigerator, the pizza from 888-8888 once the delivery driver arrives, and a banana from the backyard trash can.

Completionist
Get every achievement. There is nothing extra hiding behind it, so once the twenty nine above are done, this one lands with the last of them and the list is finished.
