Fatal Claw: All 51 Achievements Guide
A clean 100% in Fatal Claw takes several passes through the same save, and the order you do things in decides whether you get there. Curing sets the backbone. Finish a first run and Return through the Wheel of Fate, cure nobody on the second run, and cure Ain, Nia and Carbo on the third.
Those three runs are not the whole order. The End of the Black Calamity, The Light Has Faded and The King’s Shield set conditions that rule each other out, so no two of them can come from the same run, and each one needs a run played for it. Read those three sections before you decide what any run is for. The King’s Shield is also what puts Cain’s route and Sorron’s Archive within reach.
Whatever you are carrying survives a Return, so bank each Jibanam Tree Sap instead of spending it. Three saps in hand on the third run is what makes Leave No One Behind possible. Several sections below carry an ordering warning, and those are the ones that decide whether 100% is still open to you.
Fatal Claw has 51 achievements at the time of writing. Twenty-three of them need you to do something specific, and each of those gets its own section below, under the name the game uses. The other 28 arrive on their own and are listed in one table at the bottom.
One warning before you scroll. This page names bosses, endings and a late reveal about who a certain character really is. If you are on your first run and want the story to land clean, come back once you have finished it.
Before You Start: Blue Walls and the White Spirit Husk
Blue walls stop you until you upgrade one item. Equip the Black Spirit Husk, travel to White Mire and talk to White Spirit Kurtz there. That turns the husk into the White Spirit Husk, and from then on you can break blue walls. This is not an achievement by itself, but step 3 of This Settles My Debt below needs it done.
Curiosity Killed the Cat
Buy Adrian’s Tea from Lara in Aurora Village and drink it. While the tea is still working on you, go to the Mirror Chamber and kill yourself. That is the whole of Curiosity Killed the Cat.

He Was an Excellent Assistant
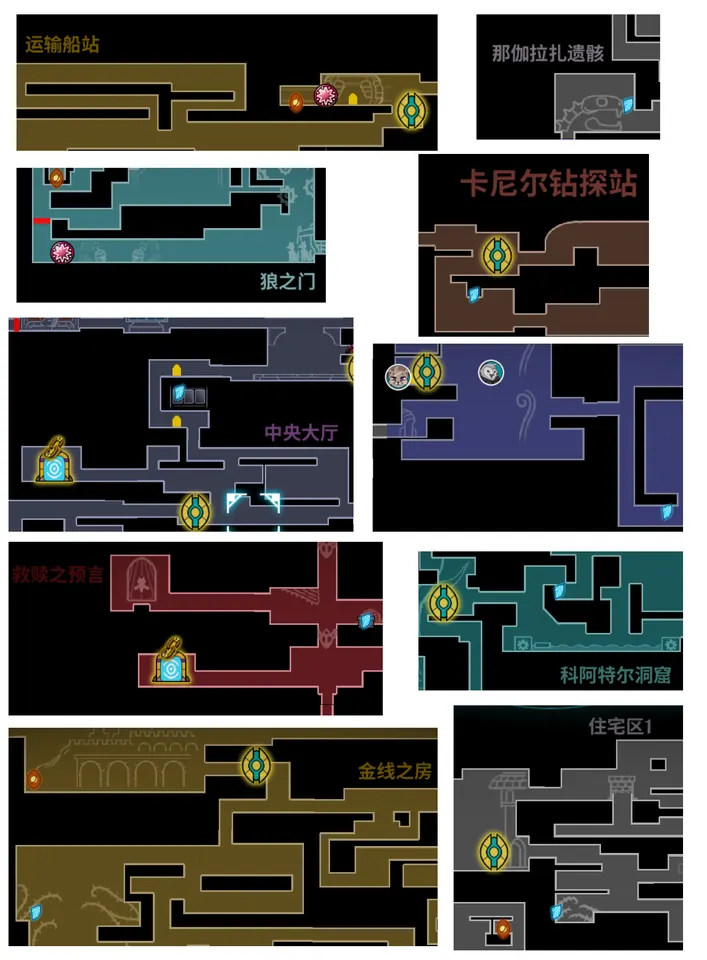
Iedart is collecting Aisare’s Stone Shards for her research, and all ten of them have to reach her. Eight are marked as icons on your map. Two more are held by people: Isaac has one on the left side of The Wolf Gate and hands it over if you talk to him, and Sneak has the other at the station on the right side of the Transport Dock, and has to be beaten for it.

The map below has those eight locations on it, one crop each, plus two crops for the NPC positions, Isaac at The Wolf Gate and Sneak at the Transport Dock. Between them you can find all ten.
The End of the Illusion
The End of the Illusion waits on the shards. Once all ten are with Iedart, the locked red door in Black Spirit Spring, below The Wolf Gate, opens. Go through it and follow the story until Sorron is standing in front of you, then defeat him and put an end to the ambitions he has held for years.

What Remains
Head back to the Origin Laboratory and follow the story through. Grande left a brooch behind, and the brooch is what lets you repair the ruined Silver Claw at the Restoration Chamber.

Where the Black Current Ends
Where the Black Current Ends wants you in the Aphotic Marsh, and that is all it wants. The path there stays shut until the Silver Claw is whole again, so What Remains has to come first.

The End of the Black Calamity
Beat Kurtz with the restored Silver Claw in hand. The claw seals him again and cuts the contamination off at its source. Both endings further down turn on whether Kurtz is still standing, so read those two sections before you take this one on a run you mean to finish.

The Beginning of Everything
The Beginning of Everything is your first Return, the one that ends the first run and starts the second. The Wheel of Fate is in the Shrine of Ancestors. Inspect it and take the Return it offers. What the game wants from you before it will offer a Return is not given here, so if the wheel is not offering yet, play the run out.

Memory Collector
Memory Collector wants a total of 20 Memory Fragments, and it is one of the achievements that only becomes possible after your first Return. Where the fragments are is not given here.

The End of a Long Mission
The End of a Long Mission asks for one infected hero purified with the Silver Claw. Four of them qualify: Mirkam, Irbes, Sommar and Saemo. Beat any one of them and purify it afterwards. Doing all four inside one run is Heroes’ Repose, further down, and that section says what state the claw has to be in.

The Light Has Faded
An ending. Beat Odz on a run where you have not beaten Kurtz and have not beaten Cain in the Hydraulic Engine Room. Kisha is left with nothing to hope for.

Two things to know before you take it. It does not Return you, it drops you back at the main menu. And the King’s Shield ending below wants the opposite on the Cain fight, so one run cannot hand you both.
The King’s Shield
Same as the ending above with one change. Beat Cain in the Hydraulic Engine Room during the run, then beat Odz with Kurtz still alive. Ortrinde stands over the fallen Kisha and keeps the infected off her.

This ending drops you into an easter-egg mode and Returns you automatically at the end of it. You get no chance to pick anything up on the way through, so collect what you want before you trigger it.
Time to Rise Again
Time to Rise Again wants one person cured. Once you are past your first Return, beating Murant seals him rather than killing him, which leaves the machine in the room to his left usable. That machine is in the Origin Laboratory. Feed it Jibanam Tree Sap to make AZSR-01, then cure someone with a dose of it: Ain, Nia or Carbo, whichever of them you get to first.

Heroes’ Repose
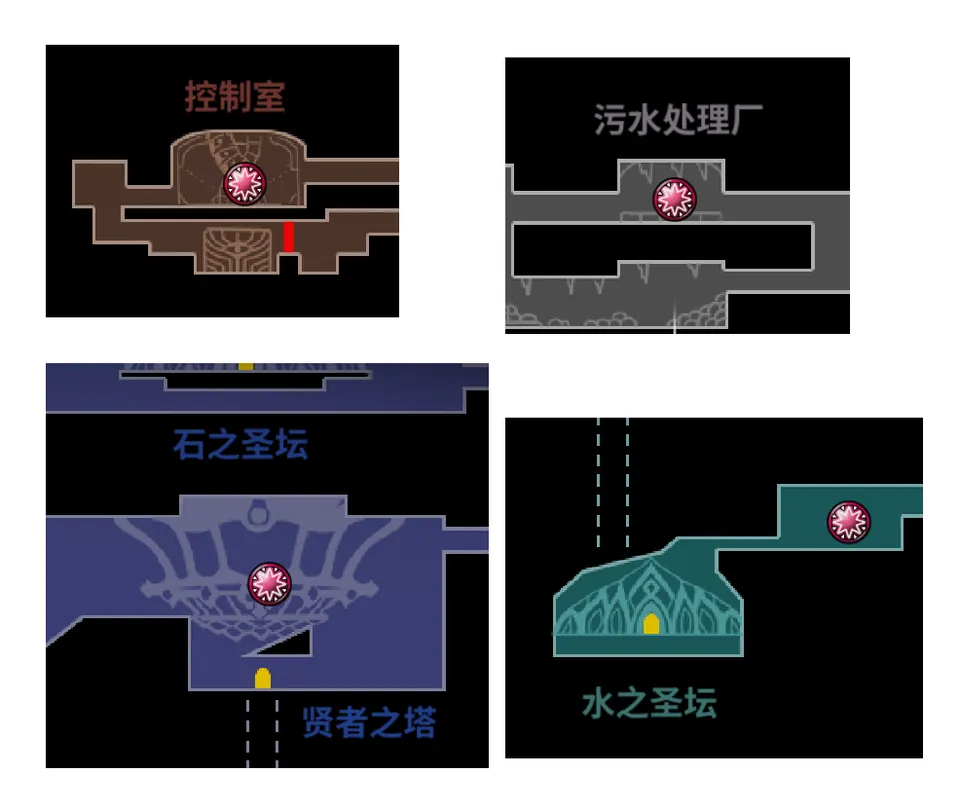
All four purifications inside a single run: Mirkam, Irbes, Sommar and Saemo. You need the restored Silver Claw in hand before any of them count, then beat each one and purify it.

If you don’t remember where the four of them are, there is one crop below for each, with the markers already placed. None of them says which hero it belongs to, so you will still be matching rooms against your own map.
Recalibration
Recalibration is the claw reset. Pay Skyle in Aurora Village 20 Memory Fragments and you get back every Kannium you have already sunk into the claw.

Gatorware Rookie
Gatorware Rookie takes four deliveries of Archive information to Max. Purifying Mirkam, Irbes, Sommar and Saemo fills in the gaps in their files, and working out that Iedart is really Enma completes hers. Beyond that, kill every enemy type you meet, and keep killing them until the analysis finishes.

This Settles My Debt
Six steps, and one of them is a whole ending. Cain has to be freed and his route played out before the path to Sorron’s Archive opens, and it runs like this:

- Beat Cain in the Hydraulic Engine Room during your run.
- Get the shards delivered and learn that Iedart is Enma, then go to Black Spirit Spring for the scene of Enma locking Cain away.
- With the White Spirit Husk upgraded, go to Black Mire and break the blue wall overhead to free him.
- Finish the King’s Shield ending, the one with both Ortrinde and Cain in it.
- Talk to Cain at the front gate once you are outside, then travel to Sorron’s Archive to start his story.
- Play his route to the end, then go and see Kisha again.
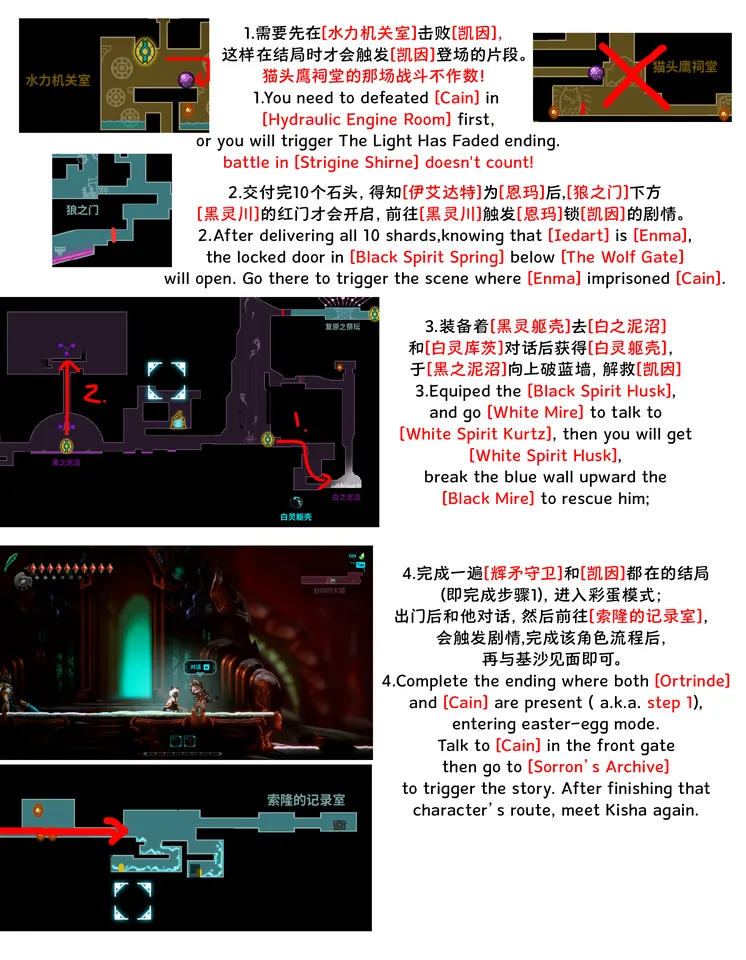
Two things catch people here. Only the fight in the Hydraulic Engine Room counts for step one. Beating Cain anywhere else does not, and if that is the only win you have, beating Odz gives you The Light Has Faded instead. And step four is not a separate errand: the ending has both Ortrinde and Cain in it because you did step one on that same run.
The King’s Return
The Blue Clockhand Stone is in Sorron’s Archive. Carry it to the Wheel of Fate, inspect the wheel to slot it in, hit the new lever to change timelines, and Return into the one it opens.

This is a special ending rather than a run you have to sit through. You can drop into it purely to fill in the Another Name entry on the in-game Stone of Narrative, then take the main menu back out and carry on where you were.
Leave No One Behind
Leave No One Behind only opens up after two Returns, which is what makes the third run the one for it. It wants Ain, Nia and Carbo all treated inside a single playthrough, so cure nobody on the second run, Return again with your saps unspent, and do all three on the third. You need the machine on that run as well, which means Murant has to go down on it too.

The sap you pick up on the second run and the one you pick up on the third are in the same spot, the top of the Jibanam Tree, where the map flags it as a treasure chest. Where the sap you carry in from the first run comes from is not given here.
Nia has a condition of her own, and it is the one that costs people this achievement. Two sanctuary seals have to be lifted before she can be treated. With one lifted she is fine and does not need you. With three lifted she dies. So the seal count is something to keep track of: before you go to Nia, know how many you have lifted, and stop at two.
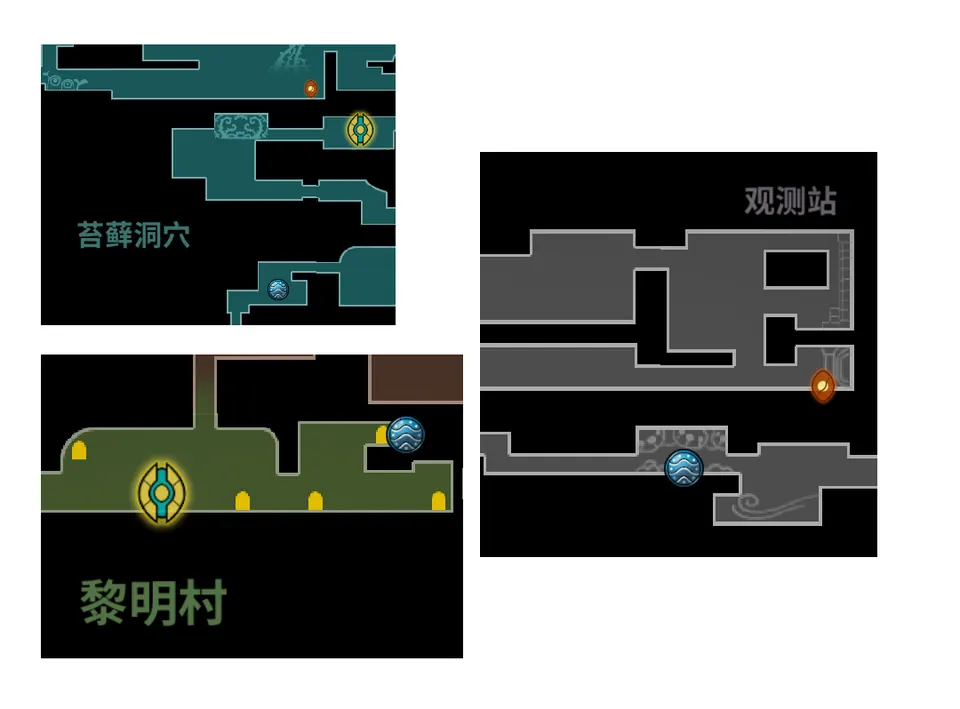
Each of the three seals has its own section below.
First Key of Hope
First Key of Hope is the seal in the Stone Sanctuary, and it will not break under normal attacks. Get the Golden Claw first, then charge an attack and release it into the golden seal.

Second Key of Hope
Second Key of Hope is the seal in the Kannir Sanctuary, lifted with the same charged attack as the one before it.

Third Key of Hope
Third Key of Hope is the seal in the Water Sanctuary, and it takes the same charged attack again.
This is the one that takes you from two lifted seals to three. If Nia still needs treating on this run, read the note under Leave No One Behind before you break it.
Remix Begins!
Jack’s Vault is the square box standing to Jack’s left, the one with two ring prints on the front. Open it and the Combinator is yours.

Remember Us
The record you want sits in the Memorial Chamber, at the bottom, dead centre. It is the Stone of Intelligence, and it holds the record of the Elord Kingdom’s last day.

Achievements That Unlock as You Play
These come to you on a normal run. You clear bosses, reach new regions and pick up gear, and they land on their own, so the table is here for checking what you are still missing at the end.
A few rows need a word of context, and those carry a note in the table. The fight in the last row is the one whose ending is decided by The Light Has Faded and The King’s Shield above.
Weed Control, Fine-Tuned!, Claw Sharpening with Kannium, Let There Be Light, Destroyed Legacy for the damaged claw, Return through a Vanrion’s Gate, and Gale Warning.


For a Great Cause, Knowledge Is Power for the Archive report to Max, Too Slow… for Irbes, Golden Castle, Dimension Walker for the gate upgrade, Sacrifice for Carbo, and Something Precious.


Did It Work?, Pull Yourself Together, 1-on-1 Lesson, Into the Darkness, The End of the Prophecy, Frozen Boundary, and Fulfill the Calling.


Bridging the Past, King’s Authority for the Golden Claw, Faster Than Lightning, Prison of the Forbidden, Sea of Energy, Water Cat, and The Last King’s End.


| Achievement | How it unlocks |
|---|---|
| Weed Control | Kill Saitin. |
| Fine-Tuned! | Equip a Cabitz. |
| Claw Sharpening | Spend Kannium on a claw upgrade. |
| Let There Be Light | Kill Mirkam and the village gets its power back. |
| Destroyed Legacy | Pick up the Damaged Silver Claw. |
| Return | Take a single trip through a Vanrion’s Gate. This is the gate trip, not a Return through the Wheel of Fate. |
| Gale Warning | Arrive at the Strigine Quarry. |
| For a Great Cause | Hand Iedart your first Aisare’s Stone Shard. |
| Knowledge Is Power | Report Archive findings to Max once. |
| Too Slow… | Kill Irbes. |
| Golden Castle | Arrive at Elord Castle. |
| Dimension Walker | Upgrade a Vanrion’s Gate. |
| Sacrifice | Kill Infected Carbo. Curing him instead is Leave No One Behind above. |
| Something Precious | Agree to what Rotri asks of you. |
| Did It Work? | Shut the Giant Guardian down with the wave discharger. |
| Pull Yourself Together | Kill Ortrinde. |
| 1-on-1 Lesson | Learn an Inherited Skill. |
| Into the Darkness | Arrive at the Black Canyon. |
| The End of the Prophecy | Clear the Trial of the Imprinter. |
| Frozen Boundary | Arrive at the Higasha Tundra. |
| Fulfill the Calling | Kill Sommar. |
| Bridging the Past | Join both halves into one Sorr Medallion. |
| King’s Authority | Pick up the Golden Claw. |
| Faster Than Lightning | Win your duel against Cain. |
| Prison of the Forbidden | Arrive at Jayma’s Dungeon. |
| Sea of Energy | Arrive at the Kannir Belt. |
| Water Cat | Gain the Meditation of Jibanam mutation and lose the fear of water. |
| The Last King’s End | Open the sealed spire gates and beat the infected King Odz behind them. |