BOMBANANA!: How to Defuse All Modules
Assign each job around the one-way communication rules, keep the current session’s manual open, and relay only the details needed for the active module to reach defusal. This guide covers all 11 normal module types and all three chaos module types.
The short version is this: the Deaf player describes visible colors and speaks to both teammates, the Blind player operates the bomb and reports audio or Braille information to the Mute player, and the Mute player reads the manual and answers with gestures. Some module-specific charts are randomized for each session, so use the methods below with the chart on your own screen. The pictured charts are examples, not permanent solutions to memorize.
How the Three Roles Communicate Across Every Module
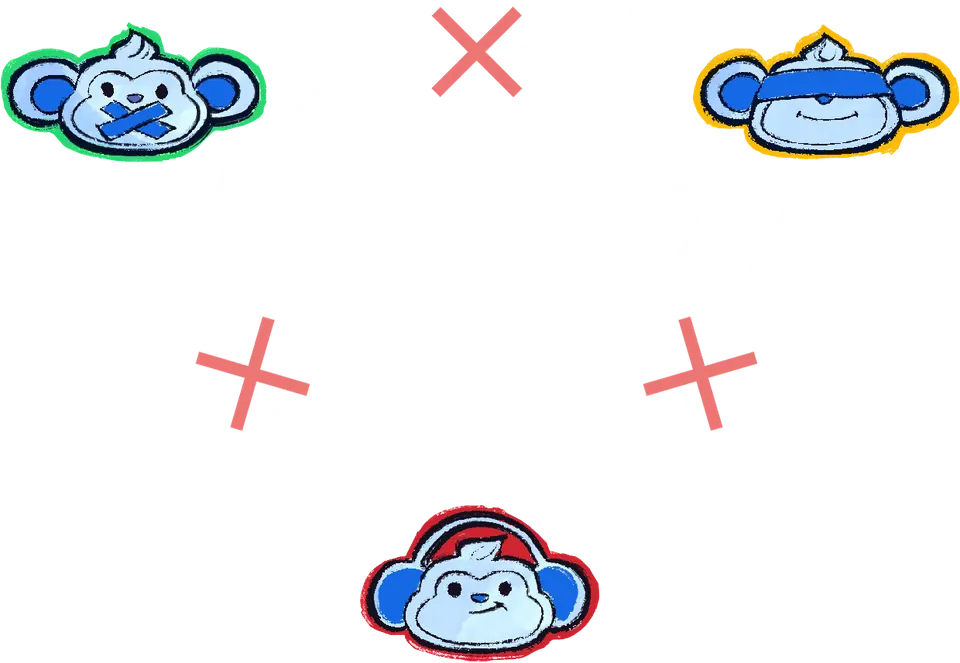
Speech travels in only one direction between each pair. Everyone can hear the Deaf player, but the Deaf player hears nobody. Nobody can hear the Mute player, although the Mute player hears both teammates. The Blind player hears only the Deaf player, and only the Mute player hears the Blind player.
The Mute and Blind players also cannot see each other. Any gesture between them has to pass through the Deaf player. In practice, the Deaf player calls out visual information, the Blind player relays sound and Braille details, and the Mute player turns the manual’s answer into a visible signal. A white arrow on the communication diagram points from the speaker to someone who hears that voice. A crossed gray arrow marks a listener who cannot hear it.
Agree on a few gestures before starting. Finger numbers work well for button positions and digits. A head raised or lowered can mean up or down. For zero, the Mute player can circle their head or show ten fingers. Color codes can use fingers or objects in the room, as long as all three players know the mapping.
Wires
The wire chart depends on the number of wires, the active indicator’s color, and the wire colors. The manual changes between sessions, so the team needs a reliable way to send the current chart result. Any of these four methods works:
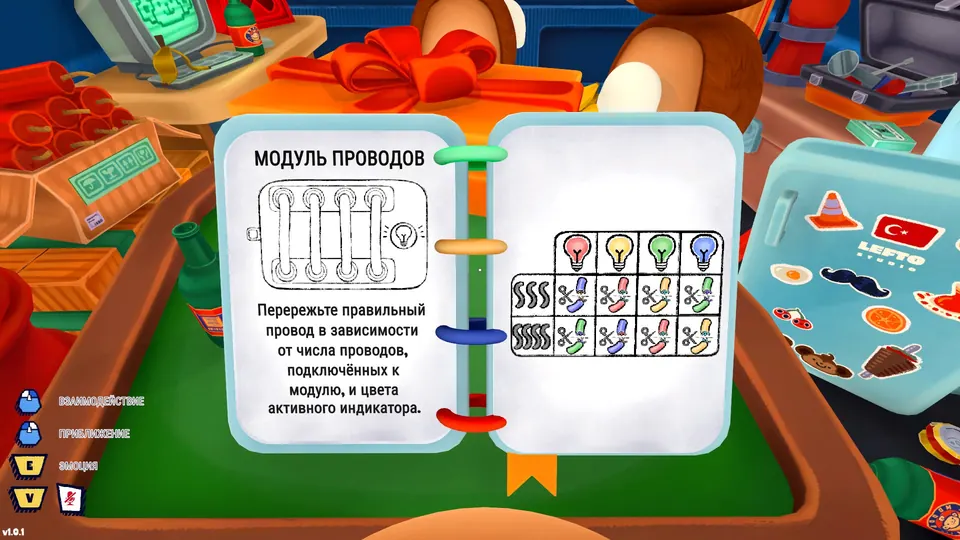
- The Deaf player names every wire color from left to right, followed by the indicator color. The Mute player finds the answer and shows the wire’s position on their fingers.
- The Deaf player gives the wire count, either three or four, and the indicator color. The Mute player identifies the target color with an agreed room object, such as a banana for yellow, dynamite for red, or a beer bottle for green.
- The Deaf player gives the wire count and indicator color, then calls the wire colors in order. The Mute player nods when the correct color is spoken.
- The Deaf player gives the wire count and indicator color. The Mute player returns the target color through a finger code, for example 1 red, 2 green, 3 blue, and 4 yellow.
The first method asks the Mute player to remember the whole color order. The other methods reduce that memory load, but they require a color code everyone understands.
Colored Sliders
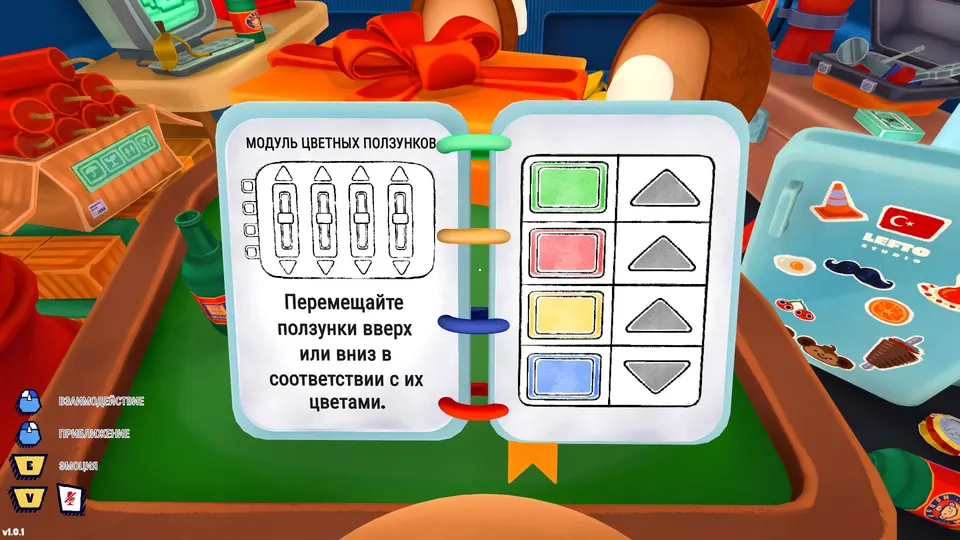
Solve the colored sliders as a live call-and-response. The Deaf player names each slider color from left to right. After every color, the Mute player immediately uses the agreed head signal for the direction shown in the current manual chart. Apply that direction to the slider, then move to the next one.
Calculator
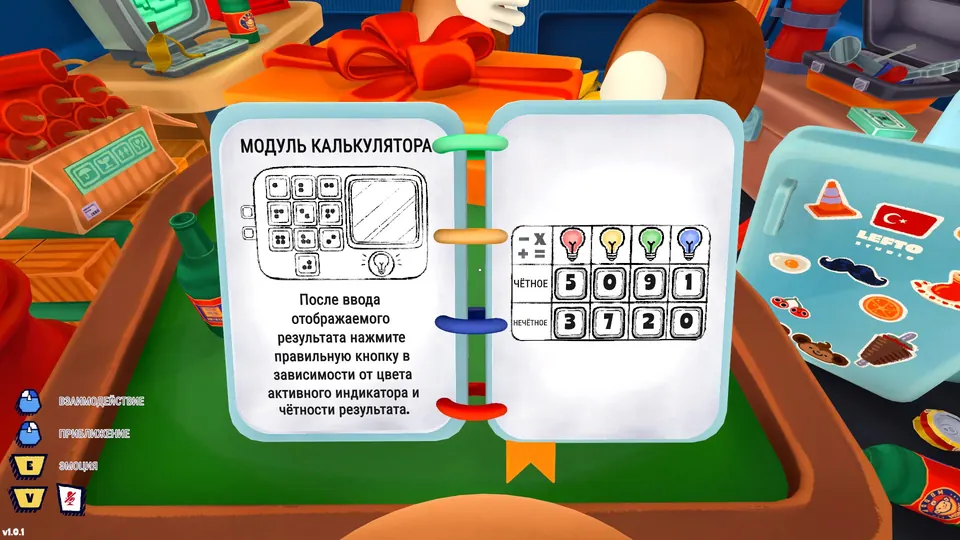
First, the Deaf player evaluates the arithmetic expression and says the result to the Blind player. The Blind player enters it. Only the Blind player can read the Braille values on the number buttons.
The final input uses both the result and the active lamp. The Deaf player reports the lamp color to the Mute player. The Mute player checks the current table, using the result’s parity and lamp color, then shows the required digit on their fingers. The Blind player enters that digit.
An even result ends in 0, 2, 4, 6, or 8. An odd result ends in 1, 3, 5, 7, or 9. If the answer is zero, use the team’s agreed zero signal.
Directions
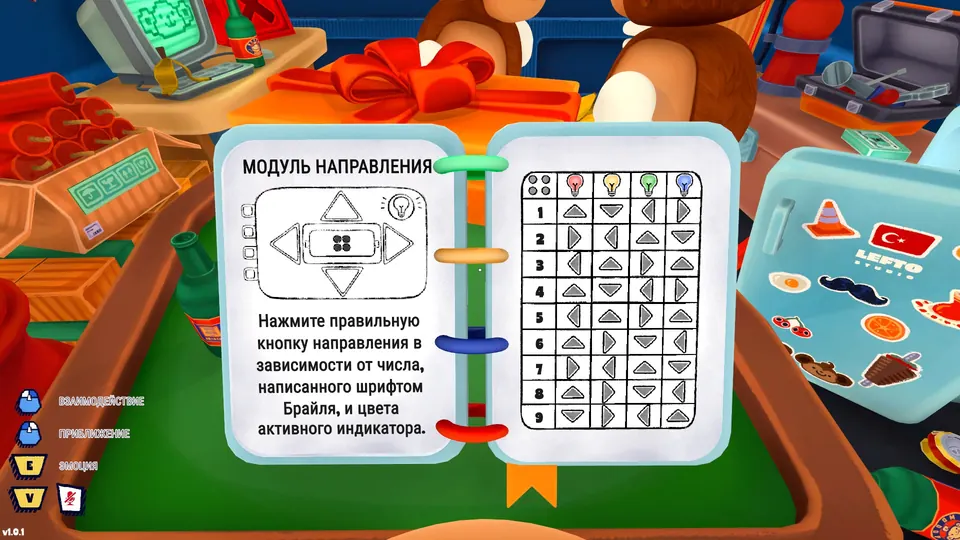
This module has four stages, but the Mute player does not need to track the stage number. A wrong direction clears the whole input, so resolve each step carefully.
For every step, the Deaf player calls the lamp color. The Blind player reads and reports the Braille digit. There is no need to describe the number of dots. The Mute player combines the color and digit in the current manual table, then uses the agreed head signal for the required direction.
Take special care with left and right. The Deaf and Mute players face each other, so a head motion toward the Mute player’s left appears as right to the Deaf player, and vice versa. Agree whether the caller will mirror the motion before passing it on.
Symbols
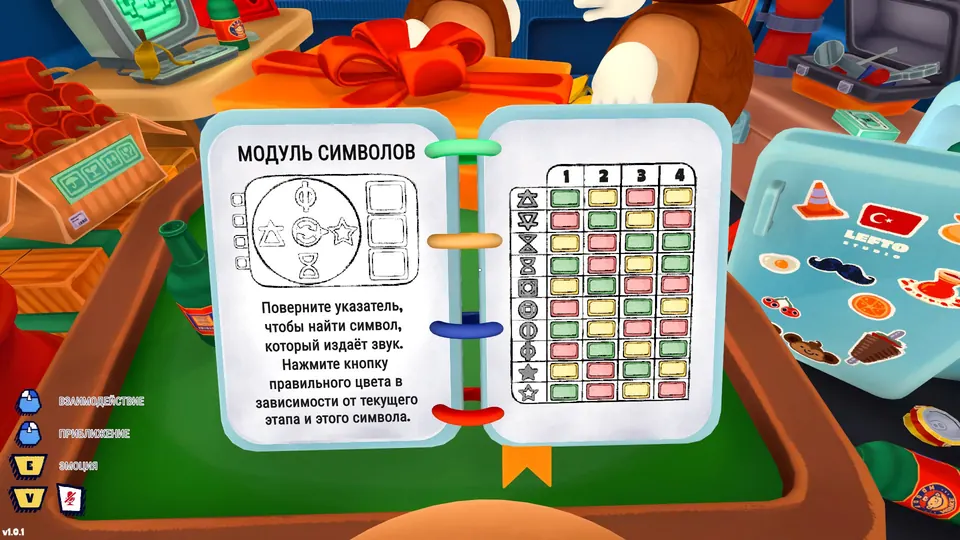
Symbols has four stages. The Mute player must track the current stage, and a wrong button resets the entire sequence.
The Blind player turns the module’s dial until one symbol produces a sound. The Blind or Deaf player then describes that symbol to the Mute player. Be precise about similar shapes, especially a filled star versus an outline star.
Next, transmit the three button colors and use the stage column for that symbol in the current manual. One option is for the Deaf player to report all three colors from top to bottom, after which the Mute player shows the correct button number. Another is for the Deaf player to call colors one at a time until the Mute player signals the required one. The Mute player can also return a color by holding an agreed object or using a finger code such as 1 red and 2 green.
Piano
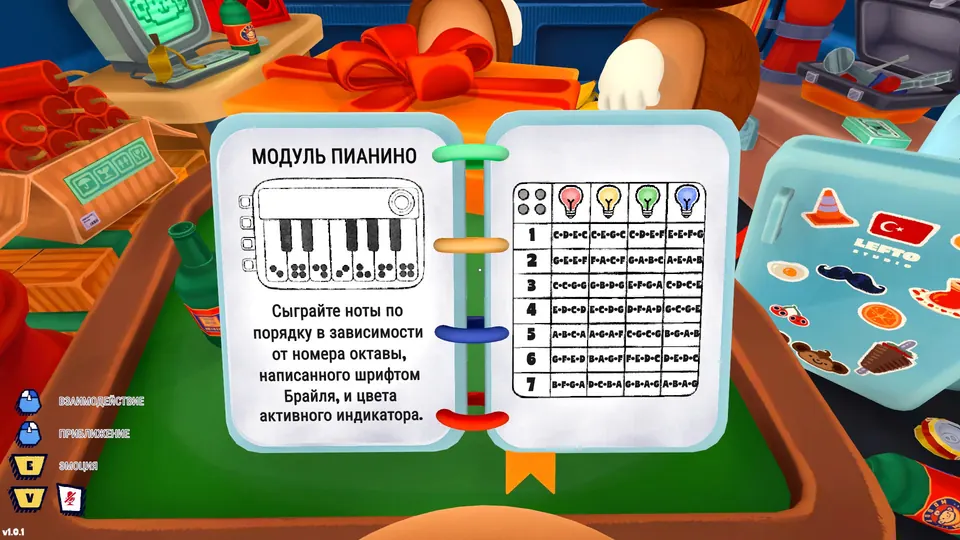
The Deaf player reports the active lamp color. The Blind player reads the Braille octave number shown on any key. That octave number is the same across the keyboard.
The Mute player finds the intersection of the lamp-color column and octave row in the current manual. That cell contains four note letters. Convert the letters to key positions and show the four numbers on your fingers in order:
| Note | C | D | E | F | G | A | B |
|---|---|---|---|---|---|---|---|
| Position from the left | 1 | 2 | 3 | 4 | 5 | 6 | 7 |
The Blind player then plays those four positions in the same order. The session chart determines the notes, so do not reuse a sequence from an earlier run.
Sound Panel
The Blind player presses buttons until one makes the distinct ringing sound. They report the Braille digit written on that button. The Deaf player reports the color of the button that lit and rang.
The Mute player uses that digit and color to locate the correct pattern in the current manual, then shows the positions that must be pressed. Number the 3 by 3 panel from the upper-left corner, moving left to right across each row:
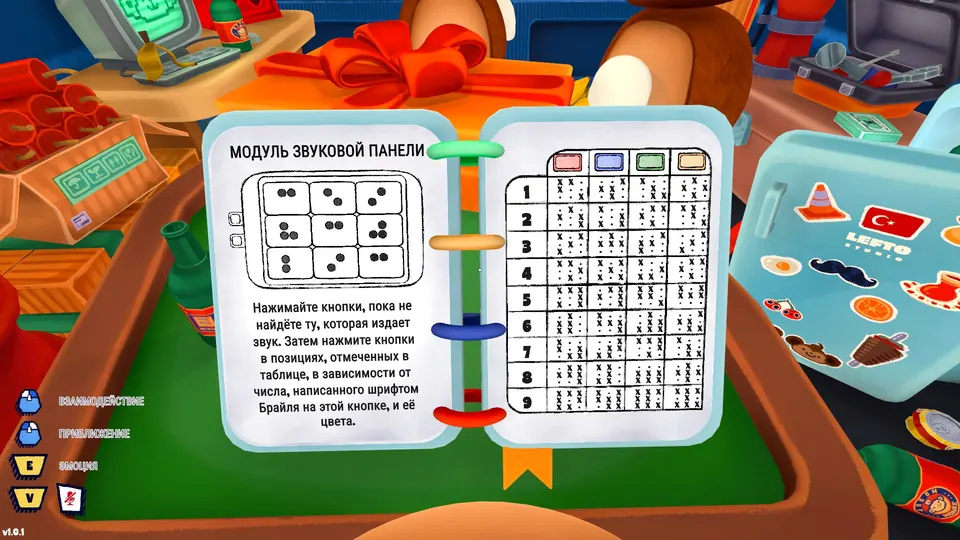
| 1 | 2 | 3 |
|---|---|---|
| 4 | 5 | 6 |
| 7 | 8 | 9 |
Calling positions by number is quicker and less ambiguous than trying to describe their locations.
Talking Monkey / Simon Says
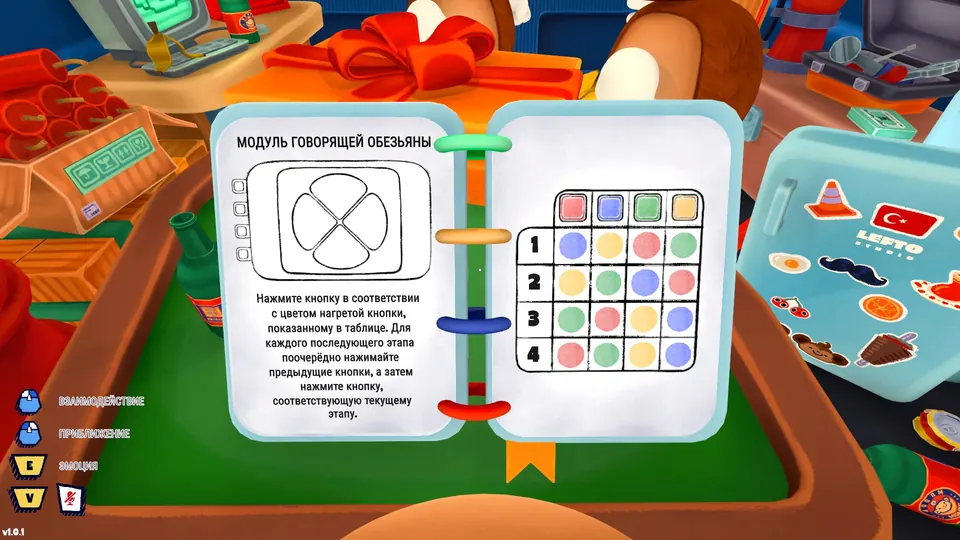
This four-stage module works like a growing Simon sequence. The Mute player tracks the current stage. A wrong press does not erase stages that have already been cleared.
The Blind player points at the heated button, which appears red from that role’s view. The Deaf player identifies and calls the button’s actual color. The Mute player looks up that color in the row for the current stage and signals the color that must be pressed.
Keep the full press sequence in memory. On stage two, repeat the stage-one answer before adding the new answer. Each later stage starts with every earlier press in order, followed by the newly mapped color. In the pictured example, a yellow heated button at stage one maps to green, but that is only an example from one randomized manual.
Switches
Send all switch information before trying to solve this module. The Deaf player reports the four colors above the switches from left to right. The Blind player reports all four Braille digits below them, also from left to right.
The Mute player selects one of three manual tables whose color order matches exactly. Use only that table to evaluate the four digits. A condition in the upper row means that switch goes up; if the condition is false, it goes down. The Mute player can show the numbers of the switches that should be up, or communicate all four positions in order, such as up, up, down, up.
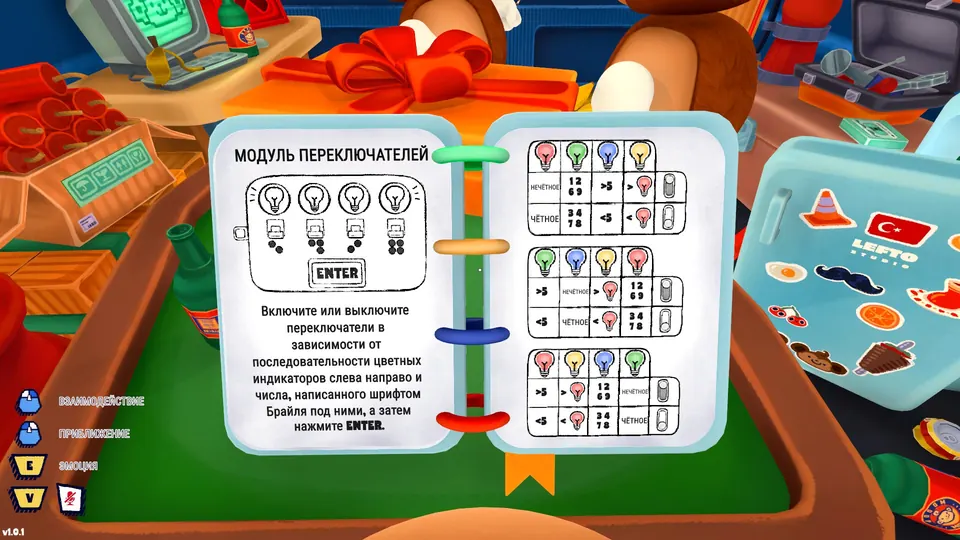
The full information matters because two color layouts may differ at only the third or fourth position. Some conditions also compare a switch with a red switch later in the row, so a one-at-a-time approach can leave out information needed for the current decision.
Morse Code
Start decoding Morse as early as possible. It is one of the heavier listening jobs for the Blind player and requires four separate sequences. The Blind player should write down each series of short and long tones, or dictate the dots and dashes to the Mute player as they arrive.
Once all four sequences are known, the Mute player converts each one to a digit. The Blind player enters the four digits and confirms the input. The digit table is:
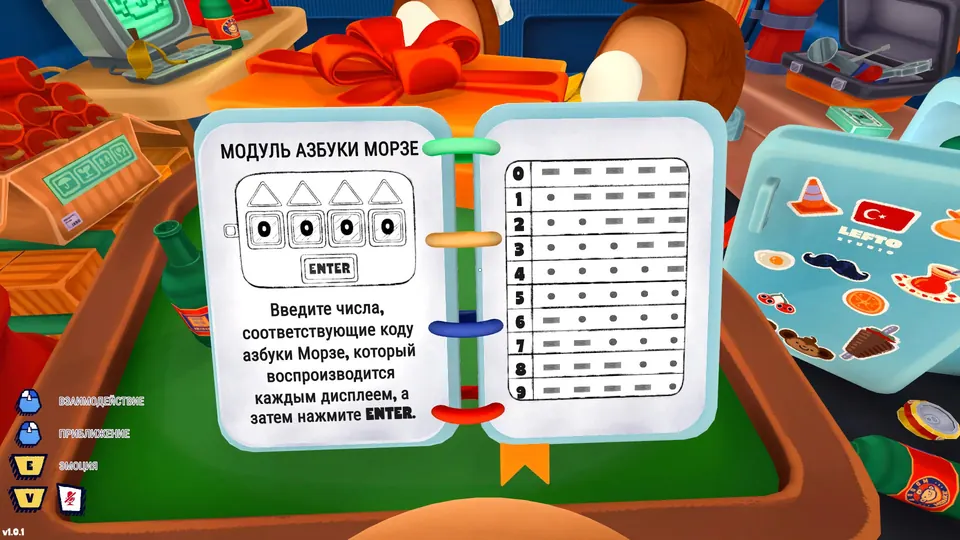
| Digit | Morse |
|---|---|
| 0 | ----- |
| 1 | .---- |
| 2 | ..--- |
| 3 | ...-- |
| 4 | ....- |
| 5 | ..... |
| 6 | -.... |
| 7 | --... |
| 8 | ---.. |
| 9 | ----. |
Use the team’s agreed zero signal if one of the four digits is 0.
Maze
A wrong direction sends the marker back to its starting position. Use the Braille maze number to select the matching maze layout in the current manual, then give both the start and destination coordinates before calling the route.
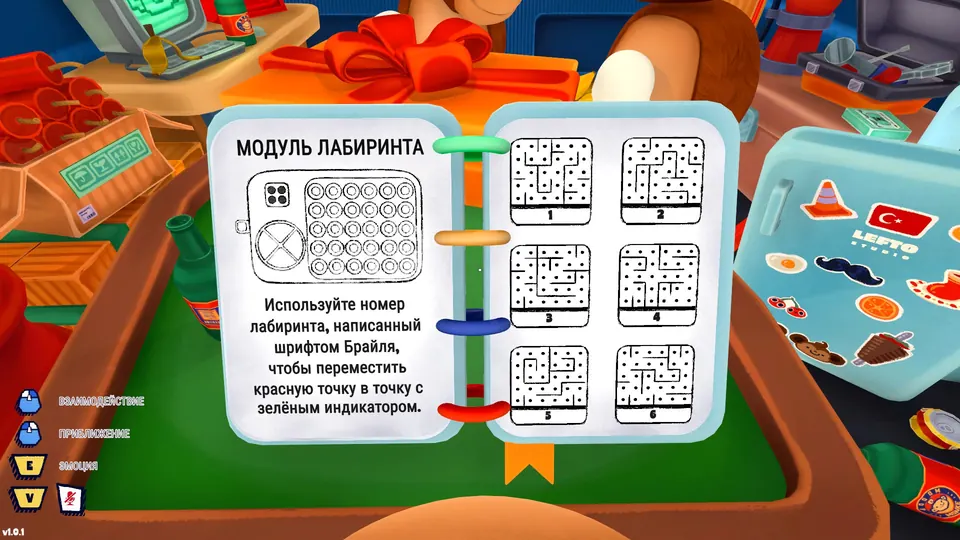
Label the six columns A through F from left to right and the five rows 1 through 5 from top to bottom. The upper-left cell is A1, the upper-right is F1, the lower-left is A5, and the lower-right is F5. A number-number system also works, but the whole team must use the same convention. Move the red point through the chosen layout toward the green indicator, one direction at a time.
Chaos: Rising Slider
The Blind player handles both the rising slider and pressure chaos modules without help from the Deaf or Mute players. Both need repeated attention until the bomb is defused.
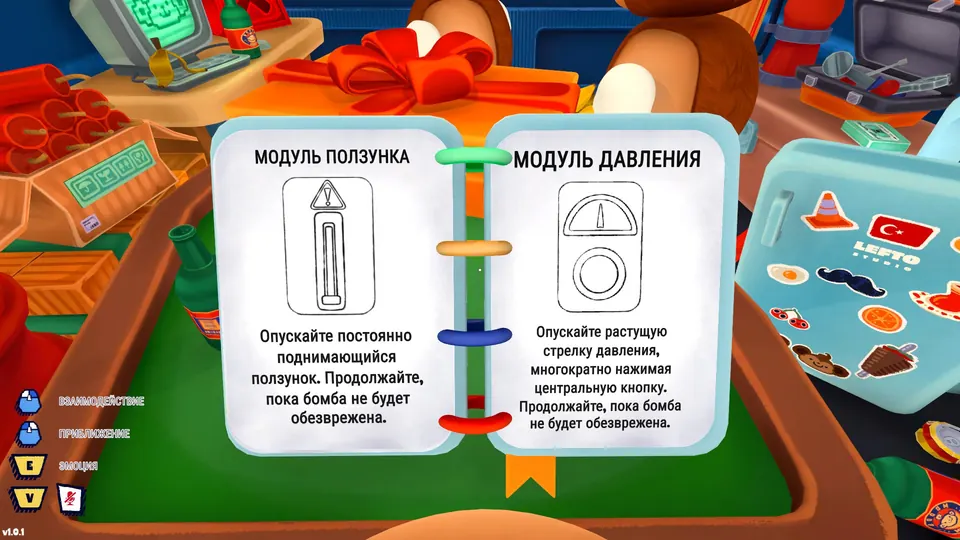
For the rising slider, grab the slider with the cursor and keep dragging it back down whenever it climbs.
Chaos: Pressure
Watch the pressure needle and repeatedly click the central button to push the rising pressure back down. Keep doing this for the rest of the defusal.
Chaos: Alarm
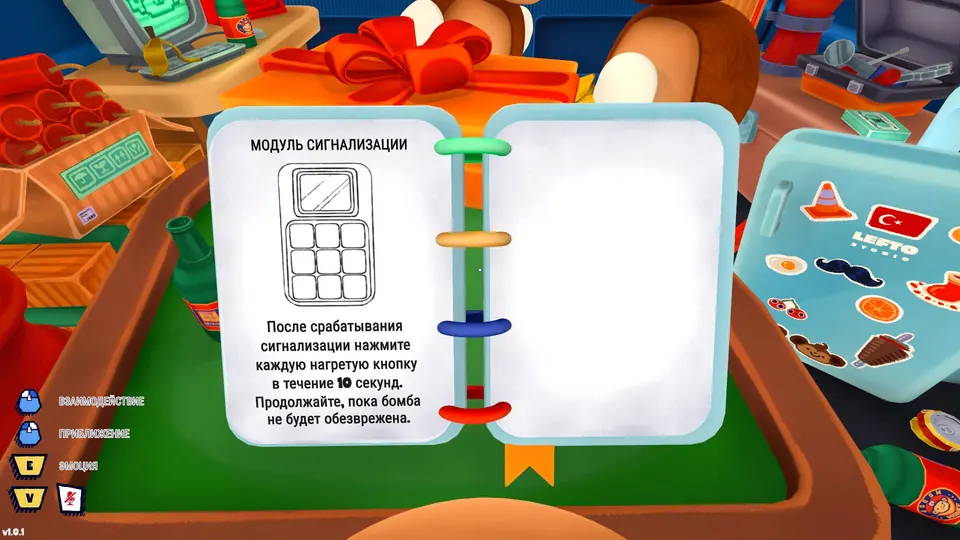
When the alarm triggers, press every heated or illuminated square within 10 seconds. The Blind player must watch for this alert and clear it without waiting for another role to call it out.